Jame's Alliance
Chapter 3 - [Level
50 - 60]
Journey from
Maraudon to Silithus
Introduction
This guide starts at level 50,
it is the 3rd chapter of my guide. Before starting I suggest you read the
introduction and recommendations of my 1st
Chapter. If you are already level 50+ and just found this guide, I suggest
you start at some point in the Chapter
II so you get the following quests, which we will be doing in this chapter:
- [49] Rise of the Silithid
- [50] Into the
- [51] The
- [53] The God Hakkar (Dungeon)
However, if at any moment in the guide you lack quest log space (because of a
class quest you don't want to abandon for exemple), then abandon [50] Into the Temple of Atal'Hakkar, you can
easily get it back later on in Stormwind right before you go to the Sunken
Temple.
Also, this guide doesn't take
into account tradeskills, class specific quests or PvP. It's 100% focused on
getting the most experience possible in the shortest possible time while
doing a lot of quests and enjoying as much content as possible, any race/class
combination can do this guide. The most part of the guide is doable solo, when
it's not it will be mentioned. The guide has been tested with four different
characters, non twinked, played by the wow-pro team: a warrior, a mage, a rogue
and a hunter to ensure that the guide is accessible for any class. Enjoy!
Shopping List
- Before level 54
1X Mithril Casing (about 70-90silver at the AH) - Before level 58 (but can equip it at level 52):
1X Your class "Dungeon Set 1" bracers.
Example:
Mages should buy Magister's Bindings.
Druids should buy Wildheart Bracers. - The sooner the better
3X Traveller backpacks (those 16 Slot backpacks). They go for 5g-8g at the auction house. Hunters and warlock should just buy two, since one of their bag slots is reserved for quiver or soul bag.
Having a lot of bag space is really important. The higher you get in levels, the more we will go for long xp circuits far from any vendor. At level 60 when you will go farm money or anything, it will also be very handy to have a lot of bag space. Why only 3 traveller backpacks and not 4? Because at level 60 you will do a long quest line named [60] You Are Rakh'likh, Demon (Elite), and one of the rewards is a 16-slot bag, so no need to waste money on a 4th traveller pack.
Level 50
- Go To Maraudon, follow this guide I wrote about
Maraudon. Doing all the quests (or at least the main ones) shoud get
you about 75% done in level 50. Don't turn in the quest [51] Seed of Life though, it's in
Moonglade and we'll make a stop there later on in the chapter.
- Time to explore new areas! Repair, resupply food
and drink (3 stacks), check the AH. Make Ironforge your homepoint.
Buy 15 silk cloth if you don't have that on you already. You'll need them
for a searing gorge quest.
In
short: Go to Searing
Gorge.
In details: From Ironforge, fly to Thelsamar, then go south to
Inside
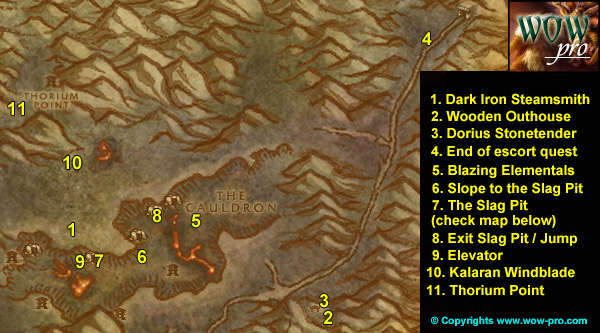
Searing Gorge:
Follow
the trail north and then west around the area named "The Cauldron"
and find Kalaran Windblade (38,39). Get the quest [48] Divine Retribution then talk to Kalaran
again and go through his dialogue. Turn in the quest and get the follow up [48] The Flawless Flame.
Go a
bit further west and you should find a path going up the mountain to Thorium
Point (32,33).
In
Thorium point, find an panel at (37,26). Right click it and get the
quests:
- [48] JOB
- [48] STOLEN: Smithing Tuyere
and Lookout's Spyglass
- [50] WANTED: Overseer
Maltorius (Elite)
Get
the 3 quests from Hansel Heavyhands:
- [49] Incendosaurs?
Whateverosaur is More like It.
- [49] Curse These Fat Fingers
- [49] Fiery Menace!
and [50] What the Flux? from Master
Smith Burninate.
Note: If you ever need to sell and repair, you
should go to this NPC.
Get
the flight path.
Your
quest log should look like this:
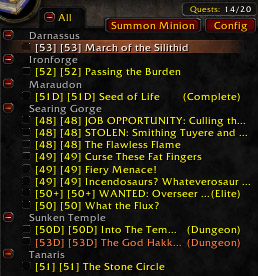
note: You should have [49] Rise of the Silithid instead of March of the
Silithid, which is the follow up. We will get it later in the guide.
Start
of Searing Gorge circuit #1
- First, go south where you'll find a big wheel
(its part of a dark iron dwarven forge) and kill all the Dark Iron
Steamsmith you find there (39,50), there should be 5 or 6
around here.
Hopefully one of them will drop the smithing tuyere you need. If not, lets just go on, we'll come back here later. - Start heading east and kill any elemental
or Heavy War Golem you find on the way. Also kill Dark Iron
Taskmasters and Dark Iron Slavers on your way. Don't wait for
respawns, just kill them while going east. At (59,35) mount up and
ride southeast to Grimesilt Dig site and find a little wooden house at (65,62)
behind the dig site, which actually looks like some public toilet. Right
click it and get the quest [45] Caught!.
Start
killing the Dark Iron dwarves in the camp as well as the golems
around here. After you have killed 8 Dark Iron Gelologists and got 15 silk cloth (if you don't have them, kill more
of those dwarves, they drop silk cloth), go back to the Wooden Outhouse and
turn in the quest, don't get the follow up though.
- Now go back to the digsite, and clear it
entirely, especially the northern part. Get full HP/Mana and get the quest
from Dorius Stonetender [48] Suntara Stones.
At (66,44)
he will stop to catch his breath and will get ambushed by 4 lvl 43 Dark Iron
Steelshifter. Easy fight for you but make sure you get at least all but one
off Dorius quickly so that he doesn't die.
At (74,19)
he will get assassinated (you can't help it) and a parchment will appear on the
floor next to him.
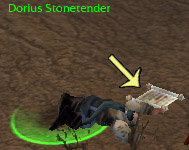
Click
it and turn in the quest, get the follow up [48]
Suntar Stones.
- Ride southwest to the entrance of The
Cauldron (63,38). Inside the Cauldron, kill all the Dark Iron
dwarves and Elementals you find. The Blazing Elementals
and the Magma Elementals drop the Heart
of Flame you need. Also kill any Heavy War Golem you find.
Note: If while killing dwarves you find a "Grimsite Outhouse Key", right click it
to start the quest [47] The Key to Freedom,
we will turn it in later on.
- Progress westwards inside the Cauldron until
you find an iron slope going up at (46,53). Follow this slope until
you find an entrance to the Slag Pit at (41,54).
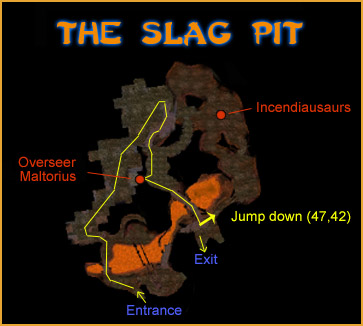
Inside
the slag pit go across the bridge, on your left will be the Quarry Gate, go
through it.
Work your way northwards until a bigger room where you'll find Enslaved
Archeologists and a big 52 Elite elite golem lying down (ignore it).
Go up the iron slope, midway on the slope you have 2 options, straight or left.
Go straight. You'll soon enter a room with several pairs of taskmasters
and slavers.
In
this room further in and to the right you'll find Overseer Maltorius and
2 Dark Iron Sentries. These are 3 elites so you can't solo them. You can
either try to find more people (I managed to duo it with mage + paladin) or
just abandon this quest. However, behind these 3 elites you can find Secret Plans: Fiery Flux.
You
need to click the plan and not be interupted for 6 seconds. So how do you do
this? Well several classes can't do it, Paladins for example. Some can, like
mage:
Sheep
the overseer, let the 2 sentries come to you, Iceroot them, run for the scroll
and loot it fast, then jump down the ledge behind the scroll.
Or
warlock, hunter: Send in the pet, quickly loot the scroll and jump down.
Or
warrior: charge the Taskmaster, and use intimidating shout. Loot the scroll
quickly and jump down.
Engineers
can probably make it too if they got a high level target dummy.
Anyway,
that's if you can't find people to kill those 3 elites with you, so try to find
people for it and in the meantime you can go on with the other quests inside
the Slag Pit. Better try it with 2 other people, its a tough fight because
Overseer is a mage and casts polymorph. If you got paladin or priest they can
dispell it. Best is to sap/sheep Overseer and kill the 2 sentries first, then
deal with the overseer alone.
- From the same big room, go over the iron
bridge which is on the opposite side of the 3 elites. On the other side of
the bridge, jump down to the lower floor at the drop off spot indicated on
the map. From this spot go east and you should find Incendosaurs,
kill 20 of them.
- When done with that, go back up the ramp and
then get out of the Slag pit, jump down back into the Cauldron and work
your way westwards looking for Blaze Elementals until you get 4 Heart of Flame.
- Then go to the iron slope you took previously
at (46,53) Follow this slope but this time skip the first entrance
to the slag pit, and get on the elevator (40,54). The elevator will
stop at the 1st floor and 2nd floor but don't get off. Wait until it's on
the 3rd floor from there you can get out of the Cauldron.
Kill
every Steamsmith you find around the buildings infront and to the left
of you after getting off the elevator (39,50). There is 5 Steamsmiths at
this spot, pray that one of them drops a smithing Tuyere. If not don't worry,
we'll kill more of these later.
- Kill every Heavy War Golem around and
go north to Karalan Windblade (39,38). Turn in the quest and get
the follow up [48] Forging the Shaft
- Go to thorium point and turn in the quests
you have completed. When turning in [50]
What the Flux?, Master Smith Burninate will open 3 new quests
to you, but they are just to work on thorium brotherhood faction, so don't
bother unless you care about this faction.
You
should be level 51 by now, if not you should grind on dark
iron dwarves in the slag pit for exemple to catch up.
Level 51
- Sell and repair, then go south to the big
dwarven forge/wheel (39,50) and kill Dark Iron Steamsmiths
again.
- Then go west and then south, basically staying
close to the cauldron but never going down in it. Kill every dwarf
and golem on your way. Basically make circles around the cauldron.
Also make sure you kill any Greater Lava Spider on sight.
There
is alot of them in an area west of the cauldron (28,47).
While
doing circles around the cauldron, make sure you kill the Dark Iron Lookouts
you can find at the feet of each of the 4 watch towers. They drop the spyglass
you need for one of the quests.
- Anyway, as soon as you got 8 Thorium Plated Daggers, go back to Kalaran
Windblade, even if you didn't finish the other quests yet.
Note: The Thorium
Plated Daggers can drop on any dark iron dwarf, it generally takes me a
full turn around the cauldron to get 8 of them.
Turn
in the quest at Kalaran Windblade and get the follow up [50] The Flame's Casing (Elite)
- Go kill the 5 Dark Iron Steamsmiths
again before you go, if you haven't got the Smithing Tuyere yet.
- Now you should ask in Looking for Group
channel if anyone is interested in doing [50]
The Flame's Casing (Elite) and [50]
Prayer to Elune (Elite) (we are gonna get this quest on the way
soon).
You
can duo these two quests but it might be a bit tough depending on the class mix
you get. So if you find more it's even better.
If you
don't find people to help you immediatly, just keep on doing circles around the
cauldron killing dwarves, giants and greater lava spiders while waiting on
people to join your group.
- Once you got yourself a group (or at least
one level 48+ partner). Go west to the Twilight camp at (24,34).
There is a cavern with Twilight mobs further to the west but don't
go there, first you should go up a narrow path up the mountain. When you
are up the path, you should face your first twilight mobs, they are all
elite and lvl 48-50. Clear through them eastwards until you reach a small
pool of lava. (27,26)
The
pool of lava might look too crowded, but actually you can get solo pulls if you
know the trick. Out of the 6 mobs at this lava pool, 3 of them are Twilight
Idolaters, and they don't assist if you pull a mob that is next to them,
they are busy performing a ritual. They will only attack if you attack them
directly.
So
first you must pull the mobs one by one and then the idolaters. Once you go the lava pool cleared, you
can go get the quest from that captured elf, Zameal Lunthistle. After
taking his quest, talk to him again and go through his dialogue, then turn in
the quest and get the follow up: [50] Prayer to
Elune.
- Now all that is left for you to do is kill Twilight
mobs (any of them) until you get :
- Symbol of Ragnaros
- Prayer to Elune
When you got both these items, you can say goodbye to your group and go back to
Kalaran Windblade. You can also go to thorium point for a quick sell/repair if
necessary.
- Turn in your quest at Kalaran Windblade and
get the follow up [50] The Torh of
Retribution. Turn it in, watch him craft the torch, then get
the quest [50] The Torch of Retribution.
Right click the stick surrounded by a green aura, complete the quest. Talk
to Kalaran again, get the quest [50] Squire
Maltrake.
Turn
in the quest at Squire Maltrake and get the follow up [52] Set Them Ablaze! (Elite)
Luckily,
this is one of the elite quests you can solo!
- Go southwest to the first watch tower (33,52).
Don't forget to kill any mob you might still need on the way (golem,
spider, dark iron steamsmith or lookout)
When
you are at the 1st watch tower, clear any mobs guarding it (minus the elite
inside of it), then search the Torch of Retribution in your inventory,
equip it, and put it on a hotkey.
There
is one elite Dark Iron Sentry on the tower, you don't need to kill it, just run
past it (or stealth past it if you are rogue/druid). If you can iceroot / sheep
/ fear it, do so, but you don't have to. Just ignore it, quickly search for a
small bowl on the floor named "Sentry
Brazier" and right click it.
It
will be instantly lit. Then jump down and run away to lose aggro on the elite.
Do
exactly the same thing on the 2nd tower (35,59), the 3rd tower (43,63)
and the 4th tower accessible only through a bridge at (52,57).
Note: The 4th tower is the one with the most Dark Iron Lookouts, in case
you didn't get a Lookout's Spyglass.
- After you are done setting the 4th tower
ablaze, go east to the Grimsite dig Camp and go turn in [47] The Key to Freedom at the wooden
outhouse.
Optional: If you
feel like you are capable of soloing a level 48 Elite (green for you at lvl
51), or if you are not solo, from the grimsite camp go south and find a narrow
path going up the mountain at (65,80), you will find a named rhino named
Margol the Rager. I soloed him with ease at lvl 51 as mage, warrior and
rogue, I just used long cooldown abilities and didn't even need to use potions.
He wanders from this path in the mountain to his cave is at (72,77).
Loot
Margol's Horn from him and click it to start the quest [48] The Horn of the Beast.
- Go back to Squire Maltrake (38,39),
turn in the quest and watch Kalaran transform into a dragon, make his
speech and then he'll fly away. Righ tclick the treasure chest named "Hoard
of the Black Dragonflight" next to where he was, accept the quest
[50] Trinkets...
Then click the chest againt and complete the quest. Look in your inventory for the red box named Hoard of the Black Dragonflight, open it and loot whats inside of it (especially the Molt, which you will need later on for a quest)
You
don't need the Torch of Retribution anymore, you can destroy it or bank it.
- Now there's only one thing left for you to
do: finish all the quests that you haven't finished yet, and you already
should know where all the mobs you need are. Once you have completed all
these quests, go back to thorium point and turn them in.
- Fly (don't hearthstone) to Ironforge and then fly to Thelsamar, ride
southwest along the road until you find Mountaineer Pebblebitty (18,84).
Turn in the quest [48] The Horn of the
Beast (Elite). Hearthstone to Ironforge, talk to the Innkeeper
and get the quest [50] Assisting Arch Druid
Staghelm.
In
Ironforge go to the Hall of Explorers and talk to Curator Thorius, turn in the
quest [48] Proof of Deed and [48] Suntara Stones. Take the follow up [48] At last!, don't get the other follow up.
Also get the quest [52] A Little Slime Goes a
Long Way from Laris Geardawdle and [52]
Passing the Burden from Historian Karnik if you don't have this
quest already (those who did Chapter II of my guide should have it).
- Fly to Thelsamar, go talk to Mountaineer
Pebblebitty once again and turn in the quest for another 4400 xp and the Key to Searing Gorge (which is kinda useless
nowadays since they added the Thorium Point flight path, so you can bank
it).
End
of Searing Gorge circuit #1.
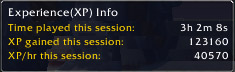
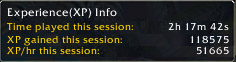
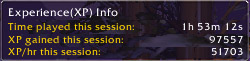
Note: I had XP Bonus for the major part of the
circuit, however if you do the math it's still around 30000 XP / hour.
Go back
to Ironforge, sell, repair, check the Auction house.
- Go to the Mystic ward and get the follow up [52] Arcane Runes from Tymor, also get [52] An Easy Pickup from him.
Go to
the Military Ward and get the follow up from Xiggs Fuselighter, turn in the
quest so you receive 2 "Standard Issue Flare
Gun".
Fly to
Menethil Harbor and take the boat to Auberdine, then fly to Rut'theran Village,
go to Darnassus and turn in the quests in the Temple of the Moon:
- [49] Rise of the Silithid and get the quest
- [53] March of the Silithid
- [50] Prayer to Elune
Go to Arch Druid Staghelm, who is on top of the tower at the Cenarion Enclave
and get the follow up [50] Un'Goro Soil.
- Make Darnassus your home location, ask a
Sentinel if you don't know where the Inn is.
Get
out of Darnassus and fly back to Auberdine, then fly to Gadgetzan.
In
Gadgetzan, turn in [53] March of the Silithid
at Alchemist Pestlezugg and get the follow up [53]
Bungle in the Jungle. Also get [54]
Super Sticky from Tran'rek.
- Resupply food/drink (4 stacks), then ride
southwest to the slope going down to Ungoro Crater (27,57).
Start
of Un'goro Circuit #1
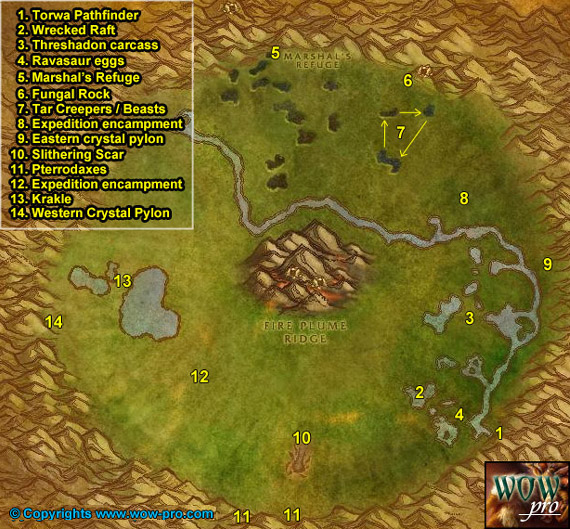
Go
down the slope and find Torwa Pathfinder to the right up a small hill (71,75).
Get the 2 quests:
- [53] The Fare of Lar'korwi
- [55] The Apes of Un'Goro
From now on, while in Ungoro Crater look around for crystals. There is 4 types
of crystals:
Red,
Blue, Yellow and Green crystals. Loot them anytime you see them until you got 7
of each color. Also look for Ungoro Dirt Piles and loot the Un'goro soil from them. Un'goro soil also drops
fairly often from most creatures in Un'goro crater, you should try to have at
least about 50 Ungoro Soil before we leave Un'goro, because we will need
extra soils for 2 other quests which will require you to transmuate Un'goro
soils into Morrowgrain.
- Go northwest until you find "A
Wrecked Raft" at (63,68). Right click it and accept the
quest [52] It's a Secret to Everybody.
Take a
dive right next to where the wrecked raft is and look underwater for yellow bag
called "A Small Pack". Click it, turn in and get the follow
up. You should receive a small pack in your inventory but don't open it for
now, it will save you some bagspace.
Kill
every dinausaur you find on your way and normally you should find a Mangled Journal at some point (if you don't you
will later on in Ungoro, don't worry). Right click the journal and get the
quest [50] Williden's Journal.
- Go northeast from here until (68,56),
where you will find a big dinosaur carcass on the floor. Right click it to
get the Piece of Threshadon Carcass.
The cog will be grey at most part of the threshadon's carcass. The only spot where you can get the yellow cog and loot the flesh is at the base of the neck, and only on the east side of the carcass. Once you have your "Piece of Threshadon Carcass", go back to Torwa Pathfinder, turn in the quest and get the follow up [53] The Scent of Lar'korwi. - Go west back into the Marshlands until you
find some purple eggs on the floor (67,73). Clear the ravasaurs
around it, then step up on the egg pile, a Lar'korwi mate should
appear and attack you, kill her and loot the Ravasaur
Pheromone Gland (75% drop rate). Then go to the next pile of eggs
north of this one (66,67), do the same thing. Go back and forth
between these 2 egg piles until you got 2 Glands. Go back to Torwa
Pathfinder and turn in the quest, don't get the follow up.
- Go back to the Marshlands and kill Dinosaurs
while looking for crystals until the following 2 goals are reached:
- level 52
- 7 Power Crystals of each color
Level 52
- Ride north then northwest to Marshall's
Refuge (46,13).
Get
the following quests:
- [52] Chasing A-Me 01
- [51] Shizzle's Flyer from Shizzle
- [52] Muigin and Larion from Muigin
- [55] Beware of Pterrordax from the Wanted Poster next to
Spraggle Frock.
- [51] Roll the Bones from Spark Nilminer
Turn
in [50] Williden's Journal and get [53] Expedition Salvation from Williden
Marshal and [52] Alien Ecology from
Hol'Anyee Marshal.
Open
the "small pack" in your inventory and loot all the items from it,
then turn in [52] It's a Secret to Everybody
at Linken (he's inside a tree trunk south of Williden Marshal), don't get the
follow up yet. You can destroy the throwing daggers and the Faded Photograph
from your inventory.
- Go inside the cave at Marshall's Refuge and go
to the end of it where you'll find a little gnome named J.D. Collie.
Get
her quest [53] Crystals of Power and
turn it in. Then get the 3 follow up quests she gives you:
- [53] The Eastern Pylon
- [53] The Northern Pylon
- [53] The Western Pylon
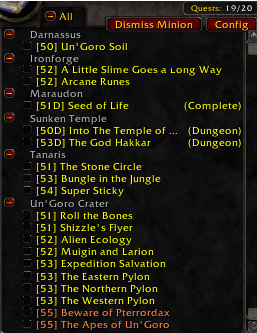
Your
quest log should look like this:
There's
a weapon merchant, use it to repair and sell junk. You can also destroy the
extra power crystals if you still have any, for more bagspace.
- Get out of Marshall's Refuge and ride east
along the wall until (54,13). At this spot go up the mountain and
you should find the Northern Crystal Pylon. Click it, and examine it, you
should get a "quest complete" message.
Further north of the crystal you should find some Pterrordax (3 of them normally), kill them.
From
this point on, kill the following mobs on sight:
- Bloodpetals of any kind (those walking
flowers)
- Pterrordaxes
- Diametradons
And
also beware of the Tyrant Devilsaurs, there is a few of them roaming in
Un'Goro. They are lvl 55ish elite, run fast and hit hard. So watch your back.
- Go east to Fungal Rock. You should find
plenty of apes there outside and inside the cave.
Kill
apes there until you get 2 un'goro gorilla, stomper
and thunderer pelts. Inside the ape cave at the first fork go right
until you find A-Me 01, turn in the quest but don't get the follow up.
Be
careful when fighting the Un'Goro Gorillas, they call for help when they get
low health, and any other ape in a rather wide range will come to help. So,
fight them away from other apes.
- Go south until you find 3 black pools with Tar
Creepers and Tar Beasts around them (60,26). Clear these
3 pools until you have 12 Super Sticky Tar
(drop rate is about 25% per kill)
- Go southeast until the expedition encampment (68,36)
and loot the Crate of Foodstuffs.
Go
southeast until you find the Eastern Crystal Pylon (76,48). Click it and
examine it.
Go
south to Torwa Pathfinder (71,75) and turn in [55] The Apes of Un'Goro, don't get the follow up. Turn in [53] The Fare of Lar'Korwi. Don't get the
follow up.
- Go west to the Slithering Scar and clear
yourself a path to the bug lair entrance at (50,76). Inside the bug
lair at the first fork go left, clear the circular room and then stand in
the middle of it, look in your inventory for a black vial named
"Scraping Vial" and click it. If it doesn't work try different
spots in this room until you get a Hive Wall
Sample.
At
this point you might already have gotten a Gorishi
Scent Gland. If you didn't, keep on killing these bugs until one drops.
It can drop from any of the bugs, inside or outside the lair, it doesn't
matter.
- Go directly south of the bug lair and up the
mountain (50,88). You should find 2 Pterrordax there, kill
them.
A bit
further to the west you should find another of those spots up the mountains
with 4 or 5 Pterrordax there (44,87), kill them. Stay at this spot until
you get your 10 Pterrodax kills, you can kill some bugs while waiting on
respawns.
- Then get on your mount and ride to the
expedition camp at (38,66), try to avoid the aggros as much as
possible because most mobs are too tough for you here. At the expedition
camp, look for a pile of crates named "Research Equipment"
and loot them. Then go northwest, run away from any aggro if you have to,
the lake is pretty safe so I suggest you just swim through it, going
northwest until you reach the big rock on the other bank. Behind this rock
you 'll find a little goblin named Krakle, get his quest quickly [55] Find the Source.
(Quickly
because a Devilsaur roams at this place every now and then. :P)
- Go directly west and a bit to the south and
you will find the western crystal pylon (23,57). Click it
and examine it.
Ride
northeast back to Marshall's Refuge and sell and repair.
If you
haven't finished [52] Muigin and Larion,
go out and kill some more flowers until you complete it. Go to the area which
is southeast of the black pools where we killed the Tar beasts. There are
plenty there and they are the easiest flowers to kill (65,27).
Also
make a stop at the Northern Crystal Pylon (55,13) and kill the 2
Pterrordax there, you should have your 10 Pterrordax kills then.
- Then go back to Marshall's Refuge and turn
in:
- [52] Alien Ecology
- [52] Muigin and Larion, Get the follow up [52] A Visit to Gregan
- [53] Expedition Salvation
- [53] The Eastern Pylon
- [53] The Northern Pylon
- [53] The Western Pylon, get the follow up quest [53] Making Sense of it from J.D.
Collie. Turn it in. You can bank the book you get as reward from this
quest (it tells you how to combine crystals at the various pylons for
some consumable crystals with effects like heals or damage shields, but
nothing so great, so just bank the book to have more bagspace).
Get
out of the cave and get the quest from Linken [52]
It's a secret to everybody.
- Get on your mount and ride west along the
mountain until you reach two stone pillars (29,22). From there,
follow the path going up the mountain until you zone into Silithus, keep
going west on the road until you reach Cenarion Hold. In Cenarion Hold
find the Hippogryph Master, he's at the feet of the highest tower. Fly to
Gadgetzan.
In
Gadgetzan, turn in [54] Super Sticky
and [53] Bungle in the Jungle, don't
get the follow up quest.
- Hearthstone to Darnassus, go to the Cenarion
Enclave, behind the tower you should find Jenal. Turn in the quest [50] Un'Goro Soil.
End
of Un'goro circuit #1
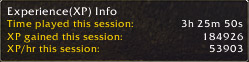
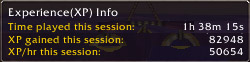
Note:
This time no xp bonus at
all, and the XP from turning in [50] Un'goro Soil is missing, because I went LD
before using hearthstone, and managed to take the screenshot quick. So that's actually
41000 XP/ Hour, not too shabby!
Go to
the top of the Cenarion tower and get the quest [50]
Morrowgrain Research from Arch Druid Fandral Staghelm. A floor below
get the follow up from Mathrengyl Bearwalker.
Search
your inventory for something named "Evergreen Pouch". From now
on, click it everytime the timer is ready, it will create an "Evergreen
herb casing", open it and loot what's inside. It can be various herbs but
sometimes it will be Morrowgrain, and that's
what you need. You need 2 Ungoro Soil
everytime you want to use the pouch, but you should still have about 20 left
even after turning the quests.
You
will need a total of 20 Morrowgrain, which you might not get if you are unlucky
with the evergreen pouch, however you will probably get 10 Morrowgrain at
least, and that's what you'll need in short term, the other 10 morrowgrains are
not so urgent, and we'll go back to Un'goro if you run out of Un'goro soils
anyway. However once you got 20 Morrowgrain you can stop using the evergreen
pouch. I personally sold the seeds and the un'goro soil I had left after
obtained my 20 morrowgrain, and also destroyed the evergreen pouch, because I
like having bag space :p. Don't stand still and do nothing while waiting on the
pouch timer though, go on with the next part of the guide! You can click on the
evergreen pouch every now and then everytime the cooldown is refreshed, until
you get 20 Morrowgrain.
- Repair, sell, visit the auction house and
resupply food/drink (4 stacks). Also go to your class trainer to get your
lvl 52 skills. (Warlocks, Paladins and Mages will have to go to
Ironforge).
Go to
Rut'Theran village and fly to Auberdine, then ride south following the road
until you zone into Ashenvale.
In
Ashenvale keep following the road until you hit Astraanar (36,49)
Make Astranaar your home location and get the new flight path.
Then
keep going east following the road until you zone into Azshara (92,46),
it's a long ride.
Right
after entering Azshara you'll find Talrendis Point to the right (11,77).
Get the new flight path. Get the two quests from the tauren named Loh'atu:
[47] A Land Filled with Hatred
[47] Spiritual Unrest
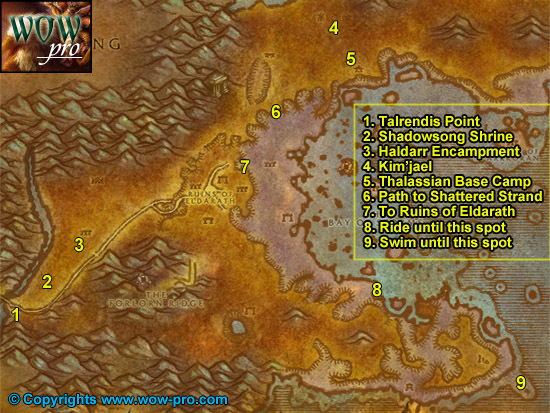
Go
north on the other side of the road to Shadowsong Shrine (13,74). Kill 6
Highborne Apparitions and 6 Highborne Lichling. There's more of them
just a bit further to the northeast
- When done with that, go further to the
northeast until Haldarr Encampment, kill satyrs there until
you have [47] A Land Filled with Hatred
complete.
- Go back to Talrendis Point and turn in the
two quests. Then get back on the road and ride northeast. Go around the
ruins of Eldarath by the west side of it and keep going northeast. Avoid
the Timbermaw Furlbogs, don't kill any of them even if they attack you,
just run away. Avoid the other timbermaw camp "ursolan", go
around it by the east side and keep riding northeast until you get to
sharp hill at (53,21), get to the top of it, you can only access it
from the north. Uptop you'll find a goblin named Kim'jael. Get his quest [53] Kim'jael Indeed.
- Just southeast of Kim'jael you'll find
Thalassian Base Camp (55,26).
Start killing Blood Elves, a lot of blood elves. This is a good grinding spot, rarely occupied. The elves have low hit points and can drop runecloth, and they respawn fast!
For those who aren't already level 53, I suggest you grind until you are level 53 and 4 bubbles of exp in (approximately 25000 XP). Read the Next paragraph though while you grind on those elves.
Level 53
- In the blood elf camp you'll find several
crates named "Kim'Jael's Equipment" scattered around.
Open them all, most of the time you'll find food in it, but 25% of the
time you'll find Kim'Jael's compass, scope, etc. You'll get them by pair of 2. So
basically you just need to find 2 "good" crates and you are
done.
- Once you got the quest complete and have
approximately 25000 xp in level 53, go back to Kim'Jael, turn in the
quest, get the follow up [53] Kim'Jael's
"Missing" Equipment.
Ride
southwest and find the path going down to the Shattered Strand (45,37),
it's right next to Ursolan, southeast of it. You'll encounter some naga
pretty soon, kill every naga on your way, go southwest, until you reach
the Ruins of Eldarath by a path at (41,48).
South
of it, at (39,50) you'll find a Pillar named Rune of Jin'yael, clear the
2 ghosts guarding it and any naga close to it. Right click the pillar,
it will use your drawing kit and you'll receive the Rubbing:
Rune of Jin'yael.
- A bit further to the south, at the central
point of the Ruisn of Eldarath you'll find the Rune of Beth'Amara (36,53).
Right click it and get the rubbing.
Just
southeast of this spot is the Rune of Markri (39,55), get the
rubbing.
And
the last one is much further to the south and a bit to the east, at (42,64)
you'll find the Rune of Sael'hai.
Grind
your way through nagas back from where you came from until the path leading to
the Shattered Strand at (45,47). Consider this as a mini grinding session,
because these nagas go down easily and there is a lot of them = good grind
spot.
You
should find "Some Rune" on one of
the nagas on the shattered strand, keep killing Spitelash sirens and myrmidons
until one drops "Some Rune".
Find
the slope taking you out of the Shattered Strand back on high ground at (46,39)
and then ride northeast back to Kim'Jael, turn in the quest.
- Ride back to the Shattered strand by the same
path (45,37). This time don't kill the nagas, just ride along the
shore directly south, avoiding nagas as much as possible and keep going
until you hit a spot where you can't go further without having to swim (58,73).
Note: if you actually like this spot and feel like grinding, do so. - Swim east and then south to the island marked
on the map (77,91), just be careful to avoid the elite giants that
walk at the bottom of the sea. Anything else you can handle.
Get on
the Helipad and use your Standard Issue Flare Gun from your inventory.
After a few seconds a gyrocopter will land and Pilot Xiggs will come out, turn
in the quest [52] Arcane Runes and
get the follow up [52] Return to Tymor
(don't worry there is still 7000 xp to come from turning that one, I didn't
make you cross the ocean for peanuts ![]() ) You can destroy the Flare Gun.
) You can destroy the Flare Gun.
- Hearthstone to Astraanar, sell, repair and
resupply food/drink up to 4 stacks.
Ride
to felwood this time! Follow the road east and then north at the fork.
In
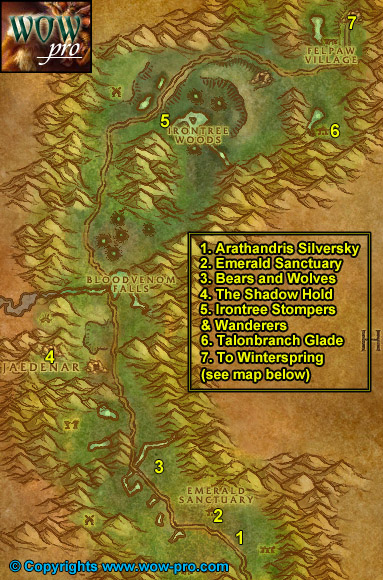
Felwood, stay on the road until you see an elf to the right named Arathandris
Silversky (54,86). Get the quest [55]
Cleansing Felwood.
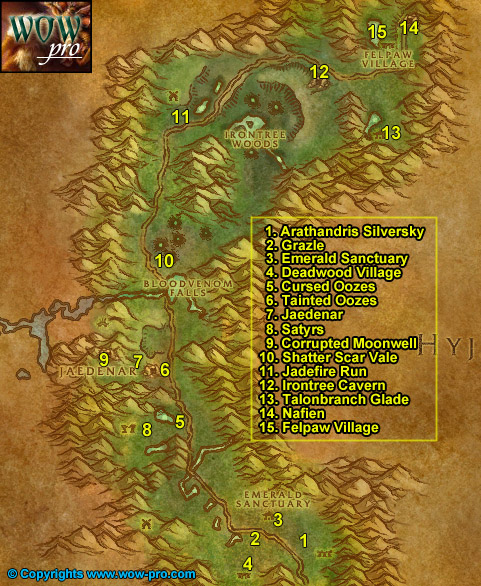
Further
along the road you'll find Emerald Sanctuary, left of the road you'll see a
furlbog named Grazle (50,84), get the quest [48]
Timbermaw Ally from him.
In
Emerald Sanctuary get [51] Forces of Jaedenar
from Greta Mosshoofand [54] The Corruption of
Jadefire from Eridan Bluewind.
Also
get the quest [54] Verifying the Corruption
from Taronn Redfeather, don't get the other quest.
- Go southwest and you'll find Deadwood Village
(49,88), start slaughtering Furlbogs. Keep doing that until
you complete [48] Timbermaw Ally
Go back to Grazle and turn in the quest, get the follow up [55] Speak to Nafien. - Ride north following the road until (43,67),
to the west should be a green pool, go there and kill Cursed Oozes.
Each time you kill one, and after looting it, target the corpse and click
on an Empty Cursed Ooze Jar from your
inventory (you get these by opening the jar container you should have in
your inventory).
Fill
up 6 Cursed Ooze Jar in the same fashion.
- Then get back on the road and ride north
until (41,59), just a bit before Jaedenar, on the left side of the
road is a small green pool with tainted oozes. Fill up 6 Tainted
Ooze Jar. If you lack oozes there is more just on the other side of
the path leading to Jaedenar. Then go to Jaedenar (40,57), clear
yourself a path westwards through Jadefire Hounds, Guardians, Adepts and
Cultists until you get to the green pool at (35,60), then go back
out of Jaedenar and you should be done with [51]
Forces of Jaedenar normally.
- When done with Forces of Jaedenar, get back
on the road and ride south, back to Emerald Sanctuary.
Get
the follow up [52] Collection of the Corrupt
Water from Greta Mosshoof.
Ride
north on the road until (42,69), which is just before the green pool
where you killed the Cursed Oozes. Go west until you find Satyrs among
the ruins (38,69). Kill whats on the kill list of [54] The Corruption of the Jadefire.
Shadowstalkers are stealthed but you can see them from far enough. Work your
way westwards through the satyrs until you reach a green moonwell. Xavathras
should be to the left of it with a guard. I killed the weak guard first quickly
and then killed Xavathras. Use long cooldown abilities if needed. Then get the
last kills you need to complete the quest on your way out.
- When [54] The
Corruption of the Jadefire is complete, get back on the road,
go north and then west back into Jaedenar, once again clear the way up to
the Green pool where you already went to when you did [51] Forces of Jaedenar.
Get
close to the moonwell and click the Empty Canteen
you should find in your inventory.
Get
out of Jaedenar and ride back to Emerald Sanctuary. Turn in [52] Colleciton of the Corrupt Water and get
the follow up [52] Seeking Spiritual Aid.
Turn in [54] Corruption of the Jadefire
and get [54] Further Corruption.
- Get back on the road, ride north and this
time past bloodvenom falls. Shortly after the bridge go right into Shatter
Scar Vale (39,44). Kill 2 Entropic Beasts, they are immune
fire and deal fire damage. Walk around in the Shatter Scar Vale until you
get the "Explore the craters" complete message. Further
to the east and a bit to the north at the last crater you should find Entropic
Horrors, they are just a bit higher level than the Entropic Beasts but
still in your range. Kill two Entropic Horrors then get back on the road.
If you don't find Entropic Horros, kill Entropic Beasts until Entropic
Horros respawn instead.
- Ride north until the road curves to the right,
just a bit further after the curve at (42,23), go north on a trail
going up to Jadefire Run.
In
Jadefire Run clear yourself a path towards the west, and then take a narrow
path towards the southwest.
At the
end of that path you'll find Xavaric (39,22), he is surrounded by
2 other satyrs and he moves from one to the other. You can actually pull each
of the guards solo, if you wait for Xavaric to be away enough from one of them.
Kill Xavaric, he's an easy fight if pulled solo.
Loot
the Flute of Xavaric and right click it to
get the quest [54] Flute of Xavaric.
- Keep killing Satyrs in Jadefire run
until you get 5 Jadefire Felbind (they
can drop from any of the 3 types of satyrs in Jadefire run) and complete
the kill list of [54] Further Corruption.
- Get back on the road and ride until Irontree
Cavern as shown on map (55,15). Kill Warpwood Elementals
until you get 15 Blood Amber, they
always drop.
Get
back on the main road, go east and then south to Talonbranch Glade (62,24).
Get the new flight path, sell and repair.
Get
back on the road and ride north until the entrance of Timbermaw Hold, talk to
Nafien, turn in the quest. Get the other quest [55]
Deadwood of the North.
Go
south on the road and at the first curve to the right make a u-turn, felpaw
village should be right infront of you (63,14).
- Start killing Deadwood furlbogs until
the kill list is complete, be careful with the Den Watchers, they
call for help, fight them away from the others. Also check your reputation
tab (press "U" key), you must be 150 reputation points away from
"Unfriendly" before you go turn in the quest, so if you aren't,
kill some more furlbogs. If you find a Deadwood Ritual Totem, don't click
it, you can't do the quest yet, as you need to be neutral with the
timbermaw furlbogs, and since we are short on quest log space, just keep
the totem in your inventory for now.
- Go turn in the quest at Nafien, get the
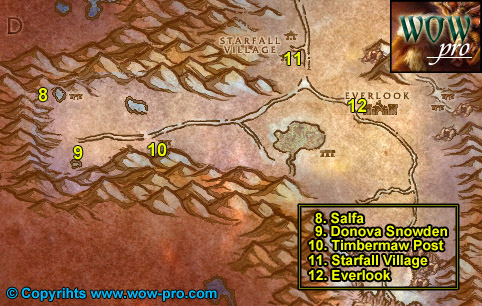
follow up [55] Speak to Salfa.
You should now no longer be attacked on sight by the Timbermaw Furlbogs.
Note: if you get 5 deadwood headdress feathers, turn them in at nafien as well, it's a repeatable quest for extra faction with the timbermaws. (You get +50 faction points per turn in) - Go inside Timbermaw Hold, after the bridge
keep going east. Right outside the tunnel to the right you'll find Salfa,
turn in the quest, don't get the other quest.
Ride
south to Donova Snowden, turn in the quest [52]
It's a Secret to Everybody, let her do her speech, and then get the
follow up [52] The Videre Elixir,
don't get the other quest.
If you
didn't go to Maraudon and/or if you don't have the quest [51] Seed of Life, use your hearthstone to
Astraanar and skip the next paragraph.
- Go back to Timbermaw Hold, this time in the
tunnels, go under the bridge and to the north, keep going until you exit in
Moonglade. In Moonglade go north straight to the shrine of Remulos (36,42),
turn in [51] Seed of Life at
Keeper Remulos. Use your Hearhstone to Astraanar
- In Astraanar, take a flight to Auberdine,
make Auberdine your home location and fly to Feathermoon in Feralas. 10
minute break while on the Hippogryph!
In
Feathermoon get the quest [50] Jonespyre's
Request from the Innkeeper, then go talk to Quintis Jonespyre at the
top of the tower east of the inn, get the follow up [50]
The Mystery of Morrowgrain and turn it in, as you should have 10 Morrowgrains at least by now, even if you're
not lucky.
- Sell/repair and resupply food/drink (up to 3
stacks). Take the boat to Feralas, then get on the road and ride north to
the twin colossals, then go west to find Gregan Brewspewer, he's exactly
under the "O" of the first o of the Twin Colossals.
Turn
in [52] A Visit to Gregan and get the
follow up [52] Haze of Evil (Dungeon)
Then
buy a "bait" from Gregan (costs 20
silver)
- Get back on the road and ride north until you
are east of the Ruins of Ravenwind. You should find Miblon Snarltooth left
of the road infront of some small temple with no roof at (44,10).
Place the bait on the floor infront of Miblon, the door behind him will
open, quickly go and loot an evoroot. Now you should be level 54
or close. If you are not level 54, go west to the ruins of Ravenwind and
grind on harpies until you ding. (Remember
to keep the Vibram Plumes from those harpies for the darkmoon faire
tickets)
Level 54
- Keep on grinding on those harpies
until your hearthstone timer is almost reset (approximately 2 minutes).
Go back to Gregan, turn in the quest to get your 3 Videre Elixir. Use your hearthstone back to Auberdine, then fly to Darnassus and turn in the quest [50] Morrowgrain at Arch Druid Staghelm if you got enough morrowgrain, if you got unlucky with combines and don't have enough morrowgrain and are out of Un'goro soils or Tharlendris seeds, go buy some extra seeds at the quest giver in the Cenarion Enclave (to be on the safe side, buy 3 Tharlendris seed per morrowgrain you still need), we will go back to Un'goro crater soon and you'll get the last un'goro soils you need there to complete this morrowgrain quest.
Sell and repair, resupply food/drink (3 stacks), check the AH. - Go get your new skills at your class trainer.
Go to ironforge and turn in:
[52] Return to Tymor (mystic ward)
[52] A Little Slime goes a long way
Get
the follow up quest. [54] A Little Slime goes a
long way.
Go
back to Auberdine (use hearthstone if it's up). Fly to Talonbranch Glade
(Felwood).
Go to
Timbermaw Hold, exit into Winterspring.
Start
of xp rate winterspring --> Un'goro --> Ratchet
Ride
south to Donova Snowden, turn in [52] The Videre
Elixir and get the follow up [52]
Meet at the Grave. Ride back to Talonbranch Glade and fly to
Talrendris Point (Azshara).
Ride
west to Ashenvale, in Ashenvale follow the road west/southwest then south to
the Barrens.
- In Barrens ride southeast to Ratchet. Infront
of a small house close to the docks you'll find Marvon's Chest (62,38),
loot the "Stone Circle" from
it. Inside the house get the quest [55]
Volcanic Activity from Liv Rizzlefix.
Make Ratchet your home location (yes, it's possible for alliance). From ratchet ride south along the merchant coast and go east to the Tidus Stair (65,43), right next to the ocean you should find Islen Waterseer next to a hut. - Turn in [52]
Seeking Spiritual Aid, watch her summon a water elemental
spirit and then take her follow up [54]
Cleansed Water Returns to Felwood.
Get
back on your mount and ride south along the merchant coast, past Northwatch
Hold. Keep following the coast until you enter Dustwallow Marsh, then keep
following the coast in Dreadmurk Shore until you arrive in Theramore Isle. Take
a gryphon ride to Gadgetzan.
In
Gadgetzan, sell/sepair, resupply food/drink up to 4 stacks. Long session
incoming. Get the mithril casing from the Gadgetzan bank, if you don't have it
on you already.
- Go to the Gadgetzan grayveyard, just east of
Gadgetzan (53,28). Drink the Videre
Elixir, you'll die, but don't worry, no durability loss from this,
it's normal. Release spirit but don't resurrect, go directly north from
the Graveyard and up the mountain, you should soon see the yellow dot on
your minimap, go to it and talk to Gaeriyan, turn in and get the follow up
[52] A Grave Situation. Go back
to the graveyard, resurrect and click the gravestone named "A
Conspicuous Gravestone", complete the qust and get the follow up [52] Linken's Sword. You can destroy the
other Videre Elixir.
- Get back on your mount and ride directly
south to Marvon Rivetseeker at the Broken Pillar (52,45), turn in [51] The Stone Circle, get his 2 follow up:
[51] Into the Depths
[52] Secret of the Circle
Ride
west/southwest until the entrance to Un'Goro. (27,57)
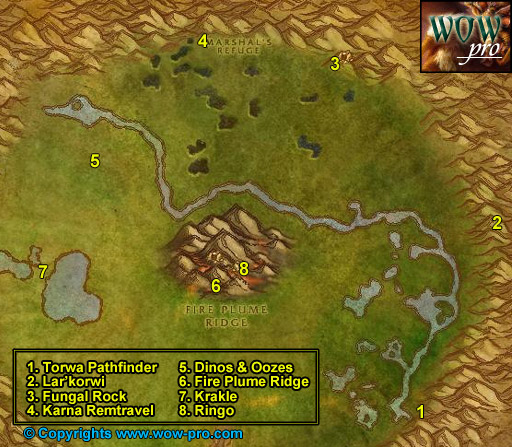
Down
the slope in Un'Goro talk to Torwa Pathfinder (71,76). Get the 2 quests
from him:
[55] The Mighty U'Cha and
[56] The Bait for Lar'Korwi
If you
don't have enough space in your quest log (because of a class quest you don't
want to abandon for example), abandon [50] Into
the Temple of Atal'Hakkar, you can get it back easily in Stormwind
later on before going to Sunken Temple.
- Ride north until the eastern crystal pylon,
go up the trail and further east and you should see some huge dinosaur
skeletons at (80,49). Be full health/mana and ready to face a level
56 mob. Open Torwa's pouch in your inventory, loot the Preserved Threshadon Meat and the Pheromone Mixture, right click the meat, and
then right click the Pheromone, Lar'korwi will appear, kill him.
He's rather easy, I had no problem to solo it at all at level 54. Loot Lar'korwi's
Head..
- Ride north/northwest to Fungal Rock (63,16).
Enter the cave, at the fork take the narrow path in the middle, then go
right and keep going until you hit the end of the cave. Just be very
careful where you fight the Un'Goro Gorilla, they call for help.
At the
end of the cave in a room with a puddle of water and a rock in the middle
you'll find U'cha, lvl 55 Gorilla. There's another gorilla in the same
room but you can pull it solo if you wait for U'cha to be away. Then pull U'cha
solo, kill it and loot his pelt.
- Clear the way out of the cave, then kill all
the apes outside the cave, make a clear path because you are gonna escort A-Me
01 out of this cave soon.
Once there's no ape left outside the cave, go back in and go right at the fork this time. After 2 or 3 more apes you'll find A-Me 01. Turn in the quest, get the follow up, turn it in (since you already have the mithril casing), then get the next follow up, [53] Chasing A-me 01. This will start the escort quest, once again the golden rule of escort quests, let A-me 01 infront, let her get hit first and then get the mobs off her. Escort her until Karna Remtravel and turn in the quest. - Go up to Marshal's Refuge, turn in the quest [52] Linken's Sword, get the follow up [52] A Gnome's Assistance, go talk to
J.D. Collie inside the crystal cave, turn in the quest, watch her do her
speech and get the follow up [54] Linken's
Memory. Get out of the cave and get the quest [55] Lost! from Spraggle Frock. Sell and
repair.
Go
southwest until you hit the river (40,27). On the southern side of the
river you'll find plenty of Dinos and some Oozes.
In
this area, kill every Frenzied Pterrordax, Elder Diametradon and Ooze
you find. Open the "bag of empty ooze
containers" from your inventory and put the 10 "Empty Pure Sample" Jar on a hotkey. Everytime you
kill an ooze, loot it and then target the corpse and click the Jars to fill
them up. You can stop killing Oozes once you got 10 Pure samples.
Keep
doing this until you complete:
[51] Shizzle's Flyer
[51] Roll the Bones (they
drop from the Elder Diametradons approximately 25% drop chance)
[55] Beware of Pterrordax
[54] A Little Slime Goes a Long Way
This might
take a while but this is decent grinding since there's quite a lot of mobs, and
you are completing 4 quests at the same time.
Warning: Be
careful, 2 devilsaurs roam this area from time to time.
- When you are done with these 4 quests, go
southeast to Fire Plume Ridge, climb the mountain from the southern side
in the middle (49,53). Find your way to the top of Fire plume
ridge, you'll have to do almost a full circle around it for that, ignore
the cave with Ringo for now. Kill every fire elemental on your way and you
should get the 9 Un'Goro Ash you need.
When
at the top of Fire Plume Ridge, next to the lava pool you should see a conic
stone named "Fire Plume Ridge Hot Spot". Search your inventory for Krakle's Thermometer, right click it next to the
conic stone, this should complete the quest [55]
Finding the Source. Don't get too close to the cave at the top,
there's a lvl 56 Elite elemental there, avoid it.
- If you got 9 Un'Goro Ash already no need to
kill more elementals, just get off fire plume ridge from the west side and
ride west until Golakka hotsprings and find Krakle behind the geyser hill (30,50).
Turn in the quest and get the follow up [55]
The New Springs.
Ride
east/southeast to Torwa Pathfinder (71,76). Turn in the 2 quests:
[55] The Mighty U'cha
[56] The Bait for Lar'korwi
- Go northwest to Fire Plume Ridge (yes,
again!). Climb on it from the southern side in the middle (49,53)
then go a bit east to reach the cave where Ringo is (52,51). Turn
in the quest [55] Lost! and get
the follow up [55] A Little Help from My
friends. Search your inventory for Spraggle's
Canteen and put it on a hotkey. Everytime Ringo faints, click
the canteen while being next to him. Get off the mountain by the
eastern side, then go north, run to Marshall's Refuge while making sure
Ringo always follows you, try to avoid mobs as much as possible. Run
inside Marshal's Refuge until Spraggle Frock, you'll get the quest
complete message.
- Time to turn in some quests!
[55] Beware of Pterrordax
[55] A Little Help from my Friends
[51] Roll the Bones
[51] Shizzle's Flyer
Finally
some space in the quest log! Let's hope blizzard extends it to 25 someday :P
Hearthstone
to Ratchet, turn in [55] Volcanic Activity
at Liv Rizzlefix, in the house just down of the inn.
End
of xp rate winterspring --> Un'goro --> Ratchet
Note: This XP rate was just to show that with a
proper quest path, you get great results even though there was a lot of
travelling. This was done without any XP bonus.
Take
the boat to Booty Bay, then fly to Stormwind.
- Now you have two options:
- 1. Get a 5 man group together and go to Sunken Temple, which I highly
recommmend because we got all the quests already, just have to pick [50] Into the Temple of Atal'hakkar from
Brohann Caskbelly in Stormwind's dwarven district and [53] Jammalan the Prophet in Hinterlands
from the Exile or ask someone to share it. These quests will give a huge
XP boost and the rewards are nice as well.
- 2. You don't want to do Sunken Temple, then I suggest you go grind in
Azshara at the Blood Elf camp or on the Nagas on the Shattered Strands,
OR kill deadwood Furlbogs in Northern Felwood to get neutral faction with
the Timbermaw Tribe and being able to turn in the totem quest.
- Before going to Sunken Temple, bind in
Stormwind, then make sure you have the 6 quests:
[50] Into the Temple of Atal'Hakkar
[51] Into the Depths
[51] Secret of the Circle
[52] Haze of Evil
[53] Jammal'an the Prophet
[53] The God Hakkar
Follow my Guide to Sunken Temple.
- For those who don't do Sunken Temple, you
will have to grind about 80000-90000XP. That's approximately half a level.
However there's plenty of good spots to grind at this level, and for good
reasons: Harpies for your Darkmoon Epic Necklace or Deadwood Furlbogs for
your Timbermaw faction.
- When you are done with Sunken Temple, turn in
all the quests besides [52] Haze of Evil,
we will go turn in it in the guide later. Also turn in the quest A Little Slime Goes a long Way when you
pass by Ironforge.
[53] Jammal'an the Prophet can be turned in Hinterlands at the Atal'ai Exile in Shadra 'Alor (35,73). You should have already leveled up inside the temple, if not, you'll get to level 55 from turning in the quests.
Level 55
- Sell and repair, resupply food/drink up to 4
stacks.
Take
the boat from Menethil Harbor to Auberdine, then fly to Rut'theran village, get
the quest [55] Moontouched Wildkin. Go
to Darnassus and make it your home location. For those who didn't turn in [50] Morrowgrain yet, go turn it in in
Darnassus at the Cenarion Enclave.
Fly to
Auberdine then to Astranaar. Ride to Felwood.
- Start of circuit Felwood --> Everlook:
In
Felwood just off the road to the right, turn in the quest [55] Cleansing Felwood at Arathandris
Silversky (54,86). Talk to her and ask her for a Cenarion beacon. From
now on when you kill stuff in Felwood you can get Corrupted
Soul shards, which you will turn in later for cenarion plant salves.
With those salves you can cure corrupted plants in felwood and get consumables
in return.
- Go further north to Emerald Sanctuary (51,82),
turn in [54] Cleansed Water Returns to
Felwood, get the follow up [55]
Dousing the flames of Protection.
Turn
in [54] Flute of Xavaric, get the
follow up [54] Felbound Ancients.
Turn in [54] Further Corruption and [54] Linken's Memory, get the follow up [54] Silver heart.
Turn in [54] Verifying the Corruption.
- Ride north along the road until (44,76),
you'll see bears and wolves to the east, from this spot,
kill all bears and wolves you find while going north, until you have 11 Silvery Claws.
Get
back on the road, ride to Jaedenar (40,57). in Jaedenar clear the way
westwards until the green pool you already went to before to fill up the
vial. Enter Shadow Hold (35,58).
At
this point if you can find people to group it will be much easier. Dousing the
Flames of Protection is doable solo (but kinda hard), on the other hand there's
an escort quest which is almost impossible solo, at least for most classes. It
also depends on how crowded the area is, if there's lots of people farming in
the shadow hold already, it's doable solo.
Clear
your way down the first tunnel, in the first room you'll find a captured elve
named Arko'narin. This is the NPC that gives the escort quest, but to
get it you first need to find a Blood Red Key
from one of the mobs inside Shadow Hold, click it and get the quest [55] A Stranged Red Key. You have to turn this
quest at Captured Arko'narin later. The follow up will be the escort quest.
- In the same room you can find the 1st and
2nd brazier (the 2nd one is on the slope going to the next tunnel), click
them to turn them off.
- If you are in a group (at least a duo of lvl
55 people), and get a Blood Red Key (the whole group can loot it if it
drops), tell everyone to turn in the first quest at the captured elf.
When everyone has turned in the first quest [55]
A Stranged Red Key, one person should start the follow up,
which is the escort quest.
Note: You have to click on the elf through the cage. Some people try to click the cage itself, but that doesn't work. - Escort Arko'Narin to her equipment, then
escort her out, things can get rough at times because she engages 2 or 3
lvl 55 mobs a the same time and is fragile until she has her equipment on.
In the same room where her equipment is you'll find the 3rd and 4th
Brazier, turn them off too. At the exit a 53 Elite mob will attack
you.
Defeat
it and then Arko'narin will leave and you'll get the quest complete message.
If you
don't find anyone to group with, just don't do the escort quest, clear your way
inside the Shadow Hold and turn off the 4 brazier.
- Once done with that, get back on the main
road and follow it until Irontree Woods (45,23). Kill Irontree
Stompers and Wanderers until one drops an Irontree Heart.
Get
back on the road follow it until Talonbranch Glade, sell and repair then go to
Timbermaw Hold. In Timbermaw go to the winterspring exit.
Right
outside of Timbermaw Hold get the quest [58]
Winterfall Activity from Salfa.
- Ride south to Donova Snowden, turn in [55] The New Springs, get the follow up [56] Strange Sources.
Also get the other quest [56] Threat of the Winterfall.
From
now on, throughout winterspring look for big white/blue feathers on the floor
named "Moontouched Feather", you need 10 of these.

- Ride east to Timbermaw Post (39,44).
Kill 8 Winterfall Pathfinder, Den Watcher and Totemic
there. If you find a Winterfall Ritual Totem, don't click it to get the quest
unless you are neutral with the Timbermaws already (you need neutral to be
able to turn in this quest in Timbermaw Hold)
Keep
killing these Furlbogs until you also get a Empty
Firewater Flask, click it and get the quest [56]
Winterfall Firewater.
- Get back on the road and ride east until a
crossroad (53,34). Go north to Starfall Village (51,30). Get
the quest [56] Starfall. Talk to
Jaron Stoneshaper, turn in the quest [56]
The Ruins of Kel'Theril and get the follow up [56] Troubled Spirits of Kel Theril. Also
get [59] Enraged Wildkin.
Get
back on the road, go south to the crossroads, when you are there go southeast
this time until everlook.
End
of circuit Felwood --> Everlook:
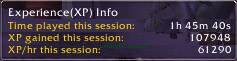
Note: I had XP Bonus during 90% of that one. So
that's about 35000 XP / Hour.
- In Everlook get [56]
Are We There, Yeti? from Umi Rumplsnicker.
In
the Inn, get the quests:
[52] Duke Nicholas Zverenhoff
[52] The Everlook Report
[55] Sister Pamela
You
can put in bank "The Everlook Report"
and "Studies in Spirit Speaking".
I'll say when to get them back from the bank later in the chapter.
Sell and repair, resupply food and drink (4 stacks), get the flight path (it's
on the eastern side of Everlook.)
- Go west to the Lake of Kel'Theril. Look
around for blue runes amidst the floor named "Highborne Relic
Fragment". Watch out before you pick any of them though, be full
health/mana, because 2 lvl 55 spawn and attack you each time you
click one. You can either kill them or run away.
- The 1st Relic fragment is at (55,43)
- The 3rd is just west of it at (53,43)
- The 4th one is directly north of the 3rd at (52,41)
- The 2nd one is west of the 4th one at (51,41)
- Ride west back to Donova Snowden (31,44)
and get as much Moontouched Feather as possible on the way.
Turn
in [56] Threat of the Winterfall and [56] Winterfall Firewater, get the follow up [56] Falling to Corruption.
Ride
north, back to Timbermaw Hold, go through it to Felwood. As soon as you exit in
Felwood, jump down west in Felpaw Village. Clear yourself a path to the camp
which is on the upper level of Felpaw Village, northwest of the green pool.
- Clear the camp (which might be hard, so use everything you
got if needed) and you should find a "Deadwood Cauldron" (60,5).
Click it, turn in the quest and get the follow up [56] Mystery Goo.
- Go back to Winterspring through Timbermaw
Hold. Go back to Donova Snowden, turn in [56]
Mystery Goo and get the follow up [56]
Toxic Horrors.
Now if
you haven't gathered your 10 Moontouched Feathers yet, go do it, then
Hearhstone to Darnassus.
In
Darnassus go to the Temple of the Moon and fill up Eridan's Vial in the
pool. Go to the bank and put the 4 relic fragments
there, as we won't be needing them for a while. You can destroy Jaron's Pick
too.
- Go out of Darnassus to Rut'theran Village and
turn in [55] Moontouched Wildkin.
Get the follow up [57] Find Ranshalla.
You
should be 56 by now, so go get your new skills. If you aren't 56
yet it's not a problem, we'll be back in town in a few.
Level 56
- Fly to Auberdine and then to Astranaar. Ride
to Felwood.
Start
of XP Circuit Felwood --> Everlook #2
Inside
Felwood just on the right side of the road you'll find Arathandris Silversky (54,86).
Turn in the Salve quests you completed there (if you don't have any gathering
skill, you will only have Salve via Hunting completed). These quests are
repeatable but only the first turn ins give XP. On the other hand you get Cenarion Plant Salves which you can use to cleanse
corrupted plants in Felwood and get buffs or consumables from them. Check this guide for more details.
- Ride further north to Emerald Scantuary. Turn
in the quests [55] Dousing the Flames of
Protection and [55] Rescue From
Jaedenar if you managed to finish that one.
Get
the two follow ups:
[58] A Final Blow
[57] Retribution of the Light
Also turn in [54] Silver Heart and [54] Felbound Ancients at Eridan Bluewind.
Get the follow up [54] Aquementas.
Also get the follow up [54] Purified!,
turn it in, you'll get the "Flue of the Ancients" as reward.
- Go back to Jaedenar into the Shadow Hold.
Clear inside the hold further than when you doused the last 2 flames, past
the red pool. Just a bit further down a slope you should find a room with
an altar in it's middle, 4 warlocks/darkweavers arouned it,
channeling a ritual, and Rakaiah infront.
You
can pull Rakaiah solo, the 4 warlocks will be aggro on you but won't attack as
long as you don't directly attack them. After you got rid of Rakaiah, you will
still be locked in combat mode because of the 4 warlocks, to lose combat mode
you just have to run back some distance away from them until they forget you.
Basically they never attack you unless you directly attack them. However the
warlock's imp pets will attack you and you should dispose of them.
- Kill the 2 other mobs on each side of the
room and the one in the back, then you can kill each of the 4 warlocks one
by one. When the room is clear, click on the Remains of Trey Lightforge
on the altar, choose your reward and complete the quest [57] Retribution of the Light, get the
follow up |57] The Remains of Trey Lightshadow.
- Go past the Altar Room and down a spiral,
after a couple of pulls you'll be facing a small bridge going up straight
ahead and a slope going down to your left.
Go
left and keep going in that direction until you reach a big room where you'll
find Shadow Lord Fel'dan and his two succubus guards.
It
wasn't an easy fight to solo, I basically used everything I had with the mage
and rogue. I sheeped Shadow Lord Fel'dan and killed the two succubus fast. Same
with rogue, I sapped the shadow lord and killed it last. With the warrior I
used retaliation. Don't forget to loot the head of
the Shadow Lord.
This
part of the dungeon is just much easier with a group, you can try it solo but I
recommend at least finding a person to duo it with.
- Clear your way out of the Shadow Hold and out
of Jaedenar, get back on the road and ride north until Irontree Woods.
Go to
the crater at (49,27), you'll find plenty of Toxic Horrors there,
kill them until you got 3 Toxic Horror Droplet.
There's more Toxic Horrors all around the big green pool just north of the
crater.
- In Irontree woods go to the ruins at (49,30)
and click the Flute of the Ancients
from your inventory. some treant spirits will appear, especially one huge
treant named Arei. If he's not there, it means someone else is
already escorting him. Go kill some treants and elementals while
waiting. Get his quest [56] Ancient Spirit
and escort Arei. He will do a full turn around the green pool, so I
suggest you clear the toxic horrors around the crater before you start the
escort. Let him be infront and get hit first or he won't assist. The good
thing is that he is quite a tank so you can let him tank a bit when there
is multiple mobs. He will get back on the road after having done a full
circle around the pool, 3 irontrees will ambush him at this point.
Kill them fast one by one while Arei tanks the others. You will get a
quest complete message normally.
- Ride back to Emerald Sanctuary, turn in the
quests [58] A Final Blow and [57] The Remains of Trey Lightforge. Ride
to Ashenvale. When in Ashenvale follow the road south and then east
towards Azshara, make a stop at Forest song which is just east of
Satyrnaar.
Turn in [56] Ancient Spirit at Kayneth Stillwind (85,44).
Get
back on the road and ride east to Azshara, go to Talrendis Point and fly to
Talonbranch Glade. Sell and repair. Go to Winterspring through Timbermaw Hold.
- Ride south to Donova Snowden, turn in [56] Toxic Horrors and get the follow up [57] Winterfall Runners.
Time
to find those runners!
Check the map below to see which path they follow, they are on the road from
Timbermaw entrance to the crossroads, then they go around the mountain by the
north and to Winterfall Village.
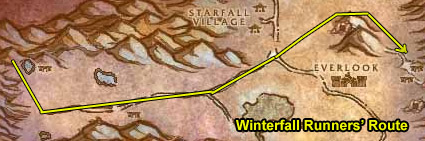
When
you find the 3 Winterfall runners (lvl 57), you don't have to kill all
3. Just kill one fast and run away, come back and loot the crate. They all drop
it.
Go to
Everlook, resupply food/drink up to 4 stacks, sell and repair.
End
of Circuit Felwood --> Everlook #2:
- Start of Circuit Everlook --> Darnassus
Go
east of Everlook to Winterfall Village (66,33), kill 8 Winterfall
Shamans and 8 Winterfall Ursa there.
Once
that is done, go south over the mountain to Ice Thistle Hills (65,41).
Kill Ice Thistle Yetis there until you have 10
Thick Yeti Fur.
- Ride south along the road. At (62,60)
you'll find a small trail going west, just a bit further you'll find a
camp named "Dun Mandarr" (59,59). Kill the owlbeasts
in it so that you can access the "Damaged Crate" in the
camp.
Click
on the Damaged Crate, turn in the quest and get the follow up. Go east and
you'll find a wagon with a keg atop at (61,60) just west of the road.
Jaron's
Supplies are at the
wagon, they are small crates half burried in the snow, loot one of them. Then
get back on the road and ride south, go over the ice bridge and keep going
south until you discover Darkwhisper Gorge and get the complete message for [56] Strange Sources.
- Go back north, past the wagon and you'll find
Ranshalla, she is on the east side of the road at (63,59) in front
of the entrance to Owl Wing Thicket. If she's not there, someone is
probably doing the escort quest already, so go kill some owlbeasts while
waiting for her to return. When you find her, turn in the quest [57] Find Ranshalla and get the follow up
[59] Guardians of the Altar.
Escort
her to the cave, inside the cave she'll start to cast a spell, while she does,
click on the stave infront of her named "Fire of Elune" and it
will be lit. You can drink/eat while she is channeling her spell, you don't
have to light the torch immediately.
Always
let her in front and get the first hit. Escort her inside the 5 caves and
light the 5 torches. Then she will go to the altar of elune, which you will
have to click too. Then a beautiful scene will happen and you will have the
quest complete message at the end of it.
While
escorting her you should have normally looted the Blue-Feathered
Amulet you need for the other quest. If you didn't, keep killing these
owlbeasts until one drops.
- Go north back to Everlook, turn in [56] Are We There, Yeti? and get the
follow up. Sell, repair and resupply food/drink.
Go east/southeast of Everlook back to Ice Thistle Hills, this time enter the cave further to the east up the hills (68,42) and kill Ice Thistle Matriachs/Patriachs until you get 2 Pristine Yeti Horn.
Go
back to Everlook, turn in [58] Are We There,
Yeti? and get the follow up. Find a goblin named Legacki, she
stands to the left of the Inn. Target her and right click Umi's Mechanical
Yeti from your inventory.
- Ride west/northwest to Starfall Village and
turn in [59] Enraged Wildkin.
Go
west to Donova Snowden, turn in the quest [56]
Strange Sources and [57] Winterfall
Runners and get away from the pool. 3 Winterfall Ambushers
will spawn shortly after you turn in the quest, but if you are away enough they
won't aggro you. Don't get the follow up.
- Go north to the Timbermaw Hold entrance and
turn in [58] Winterfall Activity
at Salfa.
Hearthstone
to Darnassus, go out to Rut'theran village and turn in [59] Guardians of the Altar and get the follow
up [57] Wildkin of Elune. Go back
inside Darnassus to Arch Druid Staghelm at the Cenarion Enclave and turn in the
quest.
End
of circuit Everlook --> Darnassus:
Note: No XP bonus at all.
- Visit the AH, resupply food/drink (4 stacks).
You can put your cenarion beacon and any Corrupted Soul Shard or
Cenarion Plant Slave at the bank, if you still have any. We are not
going back to Felwood so they are just taking bagspace for nothing now.
Same for the Flute of the Ancients, put it in the bank, I don't
dare destroying it because who knows, might need it one day for another
quest, even though I doubt it.
You should also be level 57 or very close now.
Level 57
- Fly to Tanaris. in Gadgetzan, find a goblin
named Sprinkle (she's close to the horde exit). Scare her away with the
mechanical yeti. Make Gadgetzan your home location.
If you
didn't turn in [53] The God Hakkar
yet, go east to Steamwheedle Port and turn it in.
- Go to Lost Rigger Cove (68,41), inside
lost rigger cove go south to the other side of the pirate camp and then
west until you find a stone circle (70,49).
Open
the blue bag named "Eridan's Supplies",
loot everything from it. Then step inside the circle and click the Book of
Aquor. Aquementas, a lvl 54 elemental, will come to the circle and
attack you. You don't have to kill it, just have to stand in the stone circle
and let him attack you once. If you want to kill it, just know that he is
immune to frost and deals frost damage (mages use Frost Ward). He should be
a cakewalk at level 57.
You should now have the Silver Totem of Aquementas. If you do, you can
destroy the "Book of Aquor", the "Silver Claws" and the
"Irontree Heart".
- Ride to Un'Goro Crater, when in Un'goro,
gather 3 Bloodpetal Sprouts while
heading to marshall's refuge. You get these sprouts by clicking on Bloodpetal
Sprouts (green cabbage-looking plants scattered everywhere in Un'goro)
At
Marshall's refuge turn in [52] Haze of Evil,
and then turn in the follow up immediatly (thanks to the 3 Bloodpetal sprouts
you just gathered on the way).
- Go inside the crystal cave and talk to J.D.
Collie, turn in [54] Aquementas
and get the follow up [54] Linken's
Adventure. Go to Linken and turn it in, don't get the follow up
unless you got a few people to help you. Get at least a healer and a tank
type. Blazerunner is a lvl 56 Elite fire elemental and he hits for 400. So
just save this quest for when you are level 60 and have time to spend on
that quest, the rewards aren't that great, we did it for XP.
Anyway
here is how to defeat Blazerunner, the last boss of the long quest chain
"Linken's Adventure". Go to the top of fire plume ridge, clear all
the elementals around to make sure they don't add during the fight.
Equip the Silver Totem of Aquementas and put
it on a hotkey. Click it to dispel Blazerunner's aura right at the start
and everytime it reappears. Blazerunner is somewhat invincible when his aura is
on, he keeps knockbacking people and every damage he takes is divided by 10. So
be sure to always keep that aura dispelled.
Another thing, fight him inside his cave with your back facing the walls, so if
he knockbacks you when the aura appears again you won't end up being tossed off
the mountain or into adds.
He's a tough fight, I did it with a level 57 Priest, a level 55 Paladin and me
(lvl 57 rogue) and it wasn't easy. On the other hand I soloed it with my lvl 57
frost mage, thanks to kiting, it took time and several attempts though. So I
recommend saving that quest for when you are level 60 and have time to spend on
it, unless you got enough people to help you immediately. Anyway if you do
manage to kill Blazerunner, you must also go loot the Ornate Chest in
his cave. Then turn in the quest at Linken.
- Before you leave Marshal's Refuge, find a
goblin named Quixxil and scare him with the mechanical yeti.
Hearthstone
to Gadgetzan, fly to Auberdine, take the boat to Menethil Harbor, fly to
Ironforge.
In
Ironforge, sell/repair, resupply food and drink (4 stacks), check the AH.
Go to the throne room and take the quest [54]
The Smoldering Ruins of Thaurissan from Royal Historian Archesonus,
then talk to her again and go through her dialogue. Turn in the quest and get
the follow up.
Go to
the bank and get your Black Dragonflight Molt from it (if you don't have
it on you already, that is).
- Fly to Stormwind, make Stormwind your home
location, then fly to Lakeshire, Redridge Mountains. In Redridge
follow the road north to Burning Steppes.
Go
through Blackrock Pass and then east to Morgan's Vigil, it's a narrow path
going up the mountain with torches on each side (83,63).
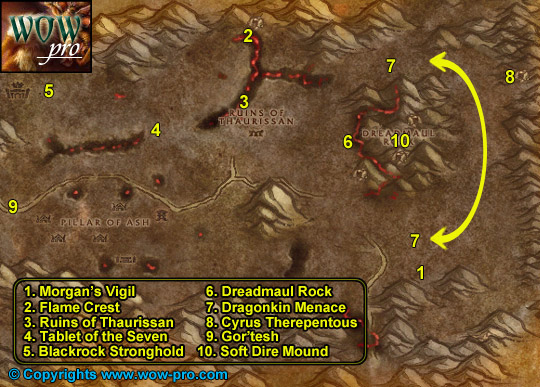
- Get the flight path.
- Get the quests [52]
Extinguish the Firegut and [56]
FIFTY! YEP! from Oralius.
- Get [54]
Dragonkin Menace (Elite) from Helendis Riverhorn.
- Don't get the other quests.
- Start of XP Circuit Burning Steppes.
Ride
northwest to Flame Crest (63,30), get [52]
Broodling Essence from Tinkee Steamboil and [50] Tablet of the Seven from Maxwort
Uberglint.
From
now on try to find a partner or more to do the quest [54] Dragonkin Menace (Elite), some of the dragons will
most likely be too hard for you to solo, so ask for help (Hunters, Warlocks and
frost mages will probably be able to solo them though). If you don't find help
immediatly for it, proceed with the next steps of the guide while actively
looking for people to help you with the dragons. When you find someone, go to
the paragraph called "Dragonkin Menace".
- Go south to the Ruins of Thaurissan and kill
mobs there while looking around for "Thaurissan Relics".
They are grey stones looking like this:
- While gathering relics go towards the western
end of the Ruins of Thaurissan, you'll find a Dwarven Statue at (53,40)
and the Tablet of the Seven at its feet. Click it and "Transcribe
the tablet". You'll receive a Tablet
Transcript.
- Once you have 12
Tablet Transcripts, go west to the Blackrock Stronghold (44,35).
Kill Orcs there unil you have 50
Blackrock Medaillons. If the place is too crowded (it often is), go
south to the area named "The Pillar of Ash", there's more
Blackrock Orcs there.
- Go east to Dreadmaul Rock (73,48).
Kill what's on the kill list of [52]
Extinguish the Firegut. You can find these ogres all
around Dreadmaul Rock, I recommend fighting on the eastern side though so
you avoid dragonkin adds.
At
this point if you still haven't found someone to help you, grind on Orcs at the
Blackrock Stronghold or PIllar of Ash. Ask your guild for help or your friends,
but get someone to help you for [54] Dragonkin
Menace.
- Dragonkin Menace
When
you find a partner to duo the dragonkins with, go to the area which is north of
Dreadmaul Rock (78,28), you should find Black Broodlings there.
Search your inventory for Draco-Incarcinatrix 900
and put it on a hotkey. Use it on every Black Broodling before killing them.
When they die while having the incarcinatrix aura on, a crystal will appear at
their corpse named "Broodling Essence". You need 8 of these.
Make a semi circle around the eastern side of Dreadmaul Rock, that's where
you'll find the dragonkins you need. Complete the kill list of [54] Dragonkin Menace while getting the 8 Broodling Essence as well.
Before you leave this area go to the northeastern edge of it, you'll find a
cave with Cyrus Therepentous in it.
Take his quest [54] A Taste of Flame,
talk to him and click on the dialogue line, then turn in the quest, get the
follow up [58] A Taste of Flame (Dungeon).
- Go west, back to Flame Crest. Turn in [52] Broodling Essence, get the follow up
[54] Felnok Steelspring. Turn in
[50] Tablet of the Seven.
Go
back to Morgan's Vigil, turn in [56] FIFTY! YEP!
and [52] Extinguish the Firegut, get
the follow up [53] Gor'tesh the Brute Lord.
Turn in [54] Dragonkin Menace, get
the follow up [54] The True Masters.
- Ride to Redridge Mountains, go to Lakeshire,
find Magistrate Solomon in the town hall and turn in [54] The True Masters.
Hearthstone
to Stormwind, go to Stormwind Keep and turn in [54]
The True Masters at Highlord Bolvar Fordragon and get the follow up.
Also get the other quest [62] The First and the
Last (Elite).
Talk
to Lady Katrana Prestor who is right next to Bolvar, go through her dialogue
then turn in the quest at Highlord Bolvar and get the follow up [54] The True Masters.
Go
talk to Mathis Shaw in the Old Town, he's on the first floor of the big
building named SI:7.
Turn
in the quest [62] The First and the last,
get the follow up, turn it in and get the follow up [62]
Flint Shadowmore.
Sell
and repair. Resupply food/drink (4stacks).
- Fly to Lakeshire, Redrige. Go to Magistrate
Solomon and turn in [54] The True Masters
and get the follow up.
Go
back to Morgan's Vigil in the Burning Steppes. Turn in [54] The True Masters at Marshal Maxwell and
get the follow up.
Ride
northwest and then west along the road which is north of the area called
"The Pillar of Ash".
On the
western end of The Pillar of Ash you should find Gor'tesh next to an orc
bunker (39,53). Kill Gor'tesh, be carefull he hits hard and has one
guard. Use everything you got if needed. Loot his head.
- Go northeast to Flame Crest. (63,30).
Talk to Ragged John and listen to his story until you get the (Complete)
message.
Go
back to Morgan's Vigil. Turn in [53] Gor'tesh
the Brute Lord and get the follow up [53]
Ogre head on a stick = Party.
Turn in [53]The True Masters, don't
get the follow up. We will get all these Blackrock Depths quests later on when
we go do the instance.
- Go north to Dreadmaul Rock, go around it by
the western side and keep going north until the slope with a bridge going
up the mountain at (75,38). Clear your way to the top of Dreadmaul
Rock. You'll find a "Soft Dire Mound" right behind some
altar (81,46). Right click it to plant the Gor'tesh
head. Then go south, back to Morgan's Vigil, turn in [53] Ogre Head on a Stick = Party.
End of Burning steppes circuit
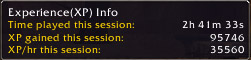
Note: I got delayed a lot because someone was
doing the onyxia key quest where a bunch of elite dragons attack Highlord
Bolvar, had to wait quite a while for Lady Katrana Prestor to reappear. Still
decent.
- Hearthstone to Stormwind, or fly there if
your stone isn't up.
Sell
and repair, check the AH, resupply food and drink (4 stacks) get the following
quest item from your bank:
"Everlook
Report"
You
can put your Alterred Black Dragonflight Molt in bank as well, you'll just have
to get it back before going to BRD.
Fly to
Ironforge, to to the throne room. Turn in [54]
The Smoldering Ruins of Thaurissan.
Fly to
Aerie Peak, follow the road southwest to Hillsbrad Foothills, then go
west/northwest along the mountain until you hit the river. Follow the river
north towards Chillwind Point, then go straight north to Western Plaguelands
until you find Chillwind Camp (43,85).
- Start of circuit Plaguelands #1
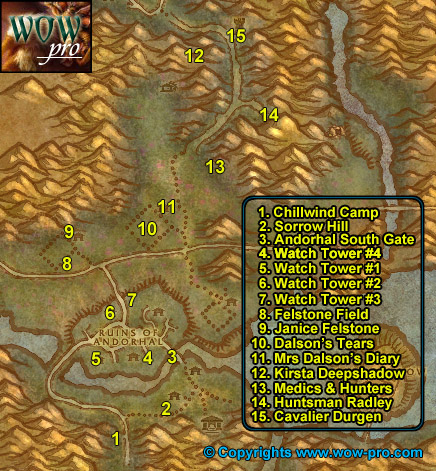
Get
the flight path. Turn in [62] Flint Shadowmore
and get the follow up [62] The Eastern Plagues.
Get [52] Clear the Way from Commander
Ashlam.
Turn in [52] The Everlook Report from
Aregent Officer Pureheart, also complete the quest Argent Dawn Commission,
you will receive a trinket.
When you kill undeads while having this trinket equiped, you can collect Scourgestones
from their bodies. I suggest equiping it from now on everytime you kill undeads
in eastern and western plaguelands.
Turning
in these Scourgestones at Argent Officer Pureheart gets you faction
increases with the Argent Dawn and a token. These tokens are the only way
to raise your faction with the Argent Dawn at a certain point in reverred, so
save them until then. Check
blizzard's official homepage to see what rewards you get at the different
faction levels.
Don't
get the other quests.
- Take the eastern road, to Sorrow hill (46,81).
Kill 10 Skeletal Flayers and 10 Slavering Ghouls.
Go
back to Chillwind camp and turn in [52] Clear
the Way, get the two follow up [53]
The Scourge Cauldrons and [56] All
Along the Watchtowers.
Go to
High Priestess MacDonnell and turn in [53] The
Scourge Cauldrons. Get the follow up [53]
Target: Felstone Field.
Go
back through Sorrow Hill and enter the Ruins of Andorhal by the south gate (49,73).
In
Andorhal try to avoid the roads as much as possible, as level 56 elite
abominations roam them. So just clear yourself a path through the destroyed
houses. Also avoid the center of the town of course, there's a huge bunch of
mobs there and Araj the Summoner (lvl 61 elite).
- Go to the Fourth Watch Tower (46,70).
Clear what's in your way but be careful not to aggro the skeletal warlord
inside of it (lvl 56-57 elite). You can drop the torch at the entrance of
the watch tower without aggroing the Skeletal Warlord if you just get
close to it without being in it's line of sight. Look for the "beacon
torch" in your inventory and click it while standing next to the
tower's door.
Go to
the Tower One which is direclty to the west (40,71). It's close
to the western entrance to Andorhal. Mark it with the torch just like you did
for the previous tower.
Go to Tower
Two, northeast of tower one (42,66). It's close to the northern
entrance to Andorhal. Mark it.
The
Tower Three is right behind tower two, northeast of it. Be careful of the
scarlet patrol and abomination patrol when you go there (44,63). Mark
tower three.
- Get out of Andorhal by the north side then go
west to Felstone Field (37,58).
Clear
yourself a path to the Cauldron in the middle of the field, when you get close,
Cauldron Lord Bilemaw will spawn, kill it and loot the Felstone Field Cauldron Key from him, then go to
the cauldron and click it, turn in the quest and get the follow up [53] Return to Chillwind Camp.
In the
Felstone Field, go to the houses on the north side of the field, enter the one
which is the most to the west (37,54).
On the
2nd floor of the house you'll find Janice Felstone, get the quest [52] Better Late than Never.
Go to
the next house which (38,55) and find Janice's Parcel inside it. Click
it, turn in the quest, then click it again and get the follow up [52] Better Late Than Never.
- Ride south to chillwind camp, avoid Andorhal
this time.
Turn
in [56] All Along the Watchtowers.
Get the follow up [55] Scholomance,
don't get the other follow up.
Turn
in [53] Return to Chillwind Camp, get
the follow up [55] Target: Dalson's Tears.
Turn
in [55] Scholomance at Alchemist
Arbington and get the follow up [57] Skeletal
Fragments.
- Go north, around Andorhal and then east to
Dalson'Tears (45,52), it's the field directly east of Felstone
Field. Clear yourself a path to the Scourge Cauldron, when you get close Cauldron
Lord Malvinious will spawn, kill it and loot his key, go to the
Cauldron and click it, turn in the quest and get the follow up [55] Return to Chillwind Camp.
- Go to the houses on the north side of
Dalson's Tears, enter the right one (47,51). Clear what's inside
and look on the floor for Mrs. Dalson's Diary, get the quest and
complete it.
Get
out of the barn and look around for a Wandering Skeleton, there is only
one of this kind and he roams around the barn, so keep killing stuff around the
barn until you find it, kill it and loot "Dalson
Outhouse Key". Go behind the barn, you'll find an Outhouse (48,49).
Open it, kill Farmer Dalson, loot Dalson Cabinet
Key.
- Go to the other house now (47,50), on
the 2nd floor of it you'll find a "Locked Cabinet", click
it and turn in the quest.
Go
straight north to the Northridge Lumbermill, when you are next to the
lumbermill, go northeast of it, follow a trail going down to a destroyed wagon.
You'll find Kirsta Deepshadow there (51,28), get the quest [56] Unfinished Business.
You
can find the Scarlets Knights and Mages you need to kill for the
quest just southeast of Kirsta, on the road to Hearthglen. For the Hunters
and Medics go to the camp further south and to the east (51,44).
When
you completed the kill list, go back to Kirsta and turn in [56] Unfinished Business, get the follow up.
- Go back on the road just east of Kirsta.
At (54,34)
the road forks off to the left and right. Go right and up the slope you will
find Hunstman Radley (57,35). He can be pulled solo.
Get
back on the main road and this time at the fork go left, keep going north until
you hit the watch tower (53,24). Kill the 2 guards infront of it then
wait for Cavalier Durgen to show up. He goes to the top of the tower
then walks back to the entrance. You don't need to go look for him inside the
tower.
- After killing Durgen, you can go directly
back to where Kirsta is by going southwest and jumping down in the crater
where she is. Turn in the quest [57]
Unfinished Business, don't get the follow up.
You
should be level 58 already or at least 5000 XP away from it. If you are not
grind on Scarlet Dudes or Undeads in one of the cauldron fields
until you are 5000XP away from 58.
- Hearthstone to Stormwind, go to the Cathedral
Square and inside the City Hall (48,32) on the 2nd floor. Turn in [52] Better Late Than Never.
Now
try to find Ol'Emma, she wanders in between the Cathedral Square and the Trade
district. Shouldn't be hard to find because you'll see the yellow dot on the
minimap. She makes a stop in a house bordering the canals close to the
Cathedral district too (52,41).
When
you find her turn in [52] Good Natured Emma.
Get the follow up [52] Good Luck Charm.
End of circuit Western Plaguelands
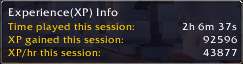
Level 58
- Go visit your class trainer, sell/repair,
visit the AH, resupply up to 4 stacks of food/water.
Get this quest item from bank:
Studies
in Spirit Speaking
Fly to
Ironforge, then fly to Chillwind camp.
Start of XP circuit Plaguelands #2
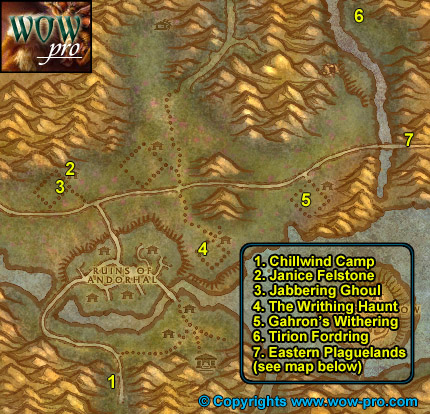
In
Chillwind Camp, turn in [55] Return to Chillwind
Camp, get the follow up [55] Target:
Writhing Haunt.
- Go north to the Felstone Field, go into the
left house (38,54) on the 2nd Floor. Turn in the quest [52] Good Luck Charm at Janice Felstone
and get the follow up [54] Two Halves
Become One.
Get
out of the house and look for a Jabbering Ghoul wandering the area in
front of the barn. If it's not there just keep the area clean until it
respawns. Kill it and it will drop a "Good
Luck Other-Half-Charm".
Once
you have the other half charm, go back to Janice Felstone, right click on the
other-half-charm in your inventory. Turn in the quest.
- Get out and back on the road, ride east until
(49,56) where a trail crosses the road. Go south following the
trail to the Writhing Haunt (52,66). Clear a path to the Scourge
Cauldron, when you get close to it, Cauldron Lord Razarch will
spawn, kill it and loot the key. Clear what's around the Cauldron and go
click it, turn in the quest and get the follow up [55] Return to Chillwind Camp.
- Go south, cross the river and go back to Chillwind
Camp through Sorrow Hill. Turn in [55]
Return to Chillwind Camp and get the follow up [58] Target: Gahron's Withering.
Ride
east through Sorrow hill, then northeast, across the river and to Gahron's
Withering (62,57). Clear a path to the Scourge Cauldron, when you get
close Cauldron Lord Soulwrath will, appear, kill it. He's harder than
the other cauldron lords, he knockbacks and silences, so be careful where you
fight him. Loot his key then go to the Cauldron, turn in the quest and get the
follow up [58] Return to Chillwind Camp.
- Ride east until you hit Thondroril River, go
north along the river bank, then cross the river so you are on the eastern
bank and ride north until you find a house. In front of it you'll see
Tirion Fordring, get his 3 quests:
[56] Demon Dogs
[56] Blood Tinged Skies
[56] Carrion Grubbage
From
now on, kill on sight the following:
- Plaguehound Runt
- Carrion Worm
- Plaguebat
- Go south along the river and then east into
Eastern Plaguelands.

Go
southeast while killing everything on the way. Find the Marris Stead but don't
get close to it! There's a lvl 62 Elite NPC there, hits like a truck. Go around
the Marris Stead so that you are on the east of it (29,74).
Just a
bit closer to Nathanos lightcaller you'll find "Mangled Human
Remains" (28,74). Loot the SI:7
Insignia (Turyen) from it.
Go a bit closer to Nathanos, on a small mound right infront of him you should
find other human remains (27,74). Loot Fredo's Insignia from it. This is
as close as you can get to Nathanos without aggroing it, and you should get the
"Blightcaller Uncovered" (Complete) message. Go backwards a
bit and then south, you should find the last human remains close to the road (28,79).
Loot Rutger's Insignia.
- Go southeast to Darrowshire, keep killing
everything on sight that you need for quests, there should be plenty.
Inside
Darrowshire, find a small destroyed house on the western side of Darrowshire.
You should find Pamela Redpath there, turn in the quest [55] Sister Pamela and get the follow up [55] Pamela's Doll.
Now
you must find the 3 parts of pamela's doll, they can be in any of the other
houses in Darrowshire, mostly on the 2nd floor of it. Look on the floor for
some brown objet. Everytime you get close to one of the doll parts, a level
55 ghost spawns and attack you.
- Once you have Pamela's Doll's Left Side,
Right Side and Head. Right click them in your inventory to combine
them. Go to Pamela and turn in the quest. Get the two follow up quests:
[56] Uncle Carlin
[56] Auntie Marlene
Go
back towards the Marris Stead and keep doing wide circles around it killing
everything until you got 30 Plaguebat and 20 Plaguehound Runts
slain. This is the best area to find them.
Go
east to the area north of the infectis scar and Corin's Crossing. Kill
everything around until you have 5 Plaguehound Kills. Focus on Carrion
Grubs as well.
- Once you got 5 Plaguehound kills, go to the
area which is north of Blackwood Lake (51,41). You should find Frenzied
Plaguehounds around this area, also kill Carrion Devourers and Bats
in the way.
Once
you have 5 Frenzied Plaguehound kills, go southeast, around the
Pestilent scar by the north of it and then go southeast to Light's Hope Chapel (81,59).
Get
the flight path. Turn in [52] Duke Nicholas
Zverenhoff. Turn in [56] Uncle Carlin,
get the follow up [55] Defenders of Darrowshire.
Just a
bit south of Light's Hope Chapel find Caretaker Alen (79,63). Get the
quest [55] Zaeldarr the Outcast from
him.
Note: Don't sell evil
bat eyes, they can be used to get Darkmoon Faire Tickets for your
future epic necklace. If you aren't interested in the Darkmoon rewards you can
sell the eyes at the AH for nice cash.
- Check how many "Slab
of Carrion Worm Meat" you need, then go kill in the area south
and southwest of Light's Hope Chapel until you got your 15 Carrion Worm Meat. Then go to Light's Hope
Chapel, fly to Chillwind camp.
Turn in [58] Return to Chillwind Camp, go to Commander Ashlam Valorfirst and complete the quest "Mission Accomplished!"
Turn
in [62] The Eastern Plagues at Flint
Shadowmore, get the follow up [62] The
Blightcaller Cometh.
- Hearthstone to Stormwind, Go to Stormwind
Keep and turn in [62] The Blightcaller
Cometh at Highlord Bolvar.
Take the follow up [62] Order Must Be Restored (Raid), we won't be doing it in the guide, however it's one of those "must do at level 60" quests. You'll need a mini raid for it, and the rewards are good.
End
of circuit Plaguelands #2:
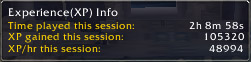
- Sell/repair, resupply food/drink (4 stacks),
check the AH.
Fly to
Ironfore, make the Inn your home location, go to the bank and get the
following quest items:
The
4 Relic Fragments.
Fly to
Chillwind Camp. Get the quest [55] A Plague Upon
Thee from Nathaniel Dumah.
- Start of XP circuit Plaguelands #3
Ride
east to Sorrow Hill and find Marlene Redpath in the only house there is (49,78).
Turn
in [56] Auntie Marlene and get the
follow up [56] A Strange Historian (Elite).
Search
the graveyard just north of the house where Marlene Redpath is, look for "Joseph
Redpath's Monument" among the graves (49,76). Click the grave
and get Joesph's Wedding Ring.
- Go back towards Chillwind Camp and take the
other path to Andorhal, go inside the Ruins of Andorhal by the western
entrance.
Just a
bit inside Andorhal go to the house to the north, it's the only house around
with a floor and not totally destroyed (39,68). Inside the house go to
the 2nd floor, in one of the rooms you'll find Chromie. Turn in [b][56] A Strange historian[/b], get the follow up [56] The Annals of Darrowshire. Also ge the
other quest [56] A Matter of Time.
- Go to the northern gate of Andorhal, and east
of the first watch tower you'll find two wooden silos (45,62) which
look like this:
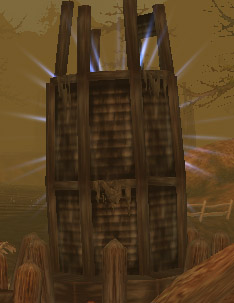
Get full
hp/mana, get next to one of them and click your Temporal
Displacer (looks like a horn). 1 to 3 lvl 57 worms will spawn and
attack you. When it's 3 it might be tough to handle solo, so always start
those fights with full hp and if possible potions / long cooldown abilities up.
Back off from the silos after you summon the worms, if you stay too close more
worms will spawn sometimes, and that's probably more than you can handle solo.
The
worms only appear when the silo is sparkling blue. They take a while to sparkle
again after you use the temporal displacer next to them. There's 3 more silos
just a bit more to the east.
Keep
doing that until you have 15 Temporal Parasites slain.
- Go back to Chromie, turn in [56] A Matter of Time and get the follow
up [56] Counting Out time.
Now
what you have to do is go from destroyed house to destroyed house in Andorhal
and look for Small Lockboxes like this:
Loot
the Andorhal Watch from it. Keep doing this until you have 5 Andorhal Watches.
- Go to the town hall (with a tower clock)
which is in the middle of Andorhal, close to where Araj the Summoner is,
you can sneak in the town hall without having to fight any of the bunch of
mobs close to it.
Inside
the town hall you'll find several "Musty Tome" lying on the
floor. When you click one, there is a chance you will find the Annals of Darrowshire, but there is a higher
chance that you will get a "Ruined Tome"
and 1 or 2 level 57 mobs will attack you. They give no loot and no exp.
Hoewever there is a trick to know which tome is the right one. There is a
slight graphical difference. The pages of the fake tomes have two-tone
colored pages, lightbrown and white, like this one:
The
good tome looks "newer", and it's pages only have one color tone,
like this one:
You
can easily see the difference if you zoom in 1st person view and put your mouse
pointer over the books to highlight them. Loot the Annals of Darrowshire.
- Go back to Chromie, turn in [56] Counting Out Time. The Attuned Dampener you get as a reward is
only useable on Araj the Summoner, so save it for later when you are 60
and do the big quests. Killing Araj is necessary to get your Scholomance
key and another quest for a decent trinket. You'll need a solid group of
60s to kill him, but the Attuned Dampener will help. You can actually
repeat the quest [56] Counting out Time
to get more dampeners for an easier Araj kill.
Turn
in [56] The Annals of Darrowshire,
get the follow up [56] Brother Carlin.
Now
you should also have finished [57] Skeletal
Fragments, if you haven't, kill some more skeletons while you are in
Andorhal.
- Get out of Andorhal by the north gate, then
go east till Thondroril River and ride north to Tirion Fordring (7,43).
Turn
in [56] Demon Dogs, [56] Blood Tinged Skies and [56] Carion Grubbage. Get the follow up [56] Redemption. Listen to Tirion's tale, turn
in the quest and get the follow up [57] Of
Forgotten Memories.
- Ride to Eastern Plaguelands and go southeast
to the Undercroft, which is directly south of the Marris Stead.
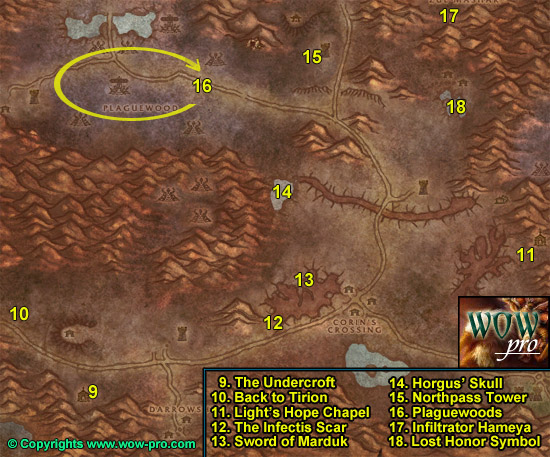
Behind
the crypt in the Undercroft you'll find Tiron Fordring's Grave (28,86).
Next to should be a "Loose Dirt Mound". This is where you need
help, this almost impossible to do solo unless you use a lot of creativy and
everything you got. Anyway here is what happens when you click the dirt mount, Mercutio
Filthgorger and 3 Dwarf Graverobbers spawn and go to the dirt mound,
if you are close they of course jump you.
They all hit hard, especially Mercutio, and all have a lot of hit points for
non elites. Here is what I suggest:
As
soon as you click the dirt mount, run to the other side of the fence, you can
jump over it if you walk up the mountain a bit. The 4 dwarves will walk to the
grave and stand there.
You
have two ways to do this now:
1. Polymorph Mercutio (if you have a
mage with you) and kill the 3 gravediggers. Then bandage up and kill
Mercutio, loot his hammer.
2. Ignore the 3 adds and go all out on
Mercurio, loot the hammer and run.
Use
creativity with the classes you have!
Ex: With my rogue I got help from a warrior.
He charged Mercutio and used intimidating shout as soon as possible to send the
3 gravediggers away for 10 sec or so. We both went all out on Mercutio, looted
and ran away. Anyway, if you don't get help immediatly, there's something to do
in the Undercroft while you look for help:
Go
inside the crypt (27,85), clear the way down, kill Zaeldarr the
Outcast and loot his head.
In the same room look for a "Torn Scroll" on the floor, click
it can get the quest [60] Hameya's Plea.
If you
still didn't get anyone to help you on [57] Of
Forgotten Memories, grind on the trolls in the Undercroft while
waiting for someone to help you. It just takes 10 min! Call a guildmate or
something. ![]()
- Go back to Tiron Fordring, turn in [56] Of Forgotten Memories, get the
follow up [58] Of Lost Honor.
Get
back into Eastern Plaguelands and ride east to Light's hope Chapel. Turn in [56] Brother Carlin, get the follow up [57] Villains of Darrowshire and [56] Heroes of Darrowshire.
Turn in [55] Zaeldarr the Outcast
further to the south at Caretaker Alen. Sell junk and resupply food and drink
there. (4 stacks).
- Ride west to the Infectis scar by passing
Corin's crossing by the south side.
Go down the Infectis Scar at (49,74), then go to
(53,65) where you'll find the "Shattered Sword of Marduk", as marked on the map. It looks like this:

Loot
it.
Get
out of the Infectis scar by the way you came in.
- Go north to Blackwood Lake (49,51).
Take a dive, in the middle of the pool at the bottom you'll see Ghosts
of Darrowshire fighting each other, amongst them you should see a
glowing violet skull named "Horgus Skull" (51,50),
it looks like this:

Loot
it.
Go
north and slightly to the east to Northpass Tower (55,24). Turn in [56] Troubled Spirits of Kel'Theril at Aurora
Skycaller inside the tower, don't get the follow up.
You should be level 59 by now.
Level 59
- Go west to the Plaguewoods. In the
plaguewoods look around for Large Termite Mounds
and
loot them.
Kill
stuff inside plaguewood while looking for those termite mounds, but also try to
find as much Cannibal Ghouls as possible. Anytime you kill one of these,
a Spirit of Darrowshire will appear, right click it to free it. You need to
free 15 Darrowshire Spirits. The Cannibal Ghouls are not so numerous
though, so it will take a while, consider this as a mini grinding session, plus
you are getting faction with the Argent Dawn and Scourgestones.
- When you are done with both [55] A Plague Upon Thee and [57] Defenders of Darrowshire, go east to
Zul'Mashar (64,24).
Clear
the way up the slope, and to the east, you'll soon face a big pyramid. At it's
base you should see tombs with some trolls roaming about them. One of them is Infiltrator
Hameya.
Clear
some of the trolls until you get a clear pull on Hameya, pull him solo and kill
him, then loot his key.
- Clear your way out of Zul'Mashar then go
southeast to Northdale, take a dive in the pool which is just south of
Northdale. Clear the elementals in the way. At (71,33), next
to a cage you should see a white flag with a blue runed on it named "Symbol
of Lost Honor":
Loot
it.
Ride
southeast back to Light's Hope Chapel.
Turn
in [55] Defenders of Darrowshire and [57] Villains of Darrowshire. Get the quest [56] Heros of Darrowshire. We won't be doing
it in the guide, however it's one of the cool quest lines to do at level 60.
- Ride west and slightly south to the
Undercroft. Right behind the crypt in the Undercroft you should find a "Mound
of Dirt". Not the one next to Tiron's grave, the other one close
to a charriot (28,86). Click it, turn in [60] Hameya's Plea.
Ride
northwest back to Tirion Fordring, turn in [58]
Of Lost Honor and get the follow up [58]
Of Love and Family.
Go
south and then west back into the Western Plaguelands.
- Go south and swim to Caer Darrow isle, On the
western side of Caer Darrow, find Artist Renfray in a wooden house (65,75).
Turn in [58] Of Love and Family
and get the follow up [60] Of Love and
Family.
This
quest will be taking you to Stratholme so it's something we won't do in the
guide. However it is a great quest, yet another 'must do" at level 60.
Swim
west until you reach Sorrow Hill, then ride west to Chillwind Camp. Turn in [57] Skeletal Fragments, get the follow up [57] Mold Rhymes With...
This
is for your Scholomance Key quest,
and clearly yet another "must do" at level 60. Don't forget to take
the quest [60] Alas, Andorhal from
Commander Ashlam Valorfist when you go kill Araj for your Scholomance Key quest
- killing two birds with one stone.
Turn
in [55] A Plague Upon Thee, take the
follow up [55] A Plague Upon Thee.
- Ride north around Andorhal and then northeast
to Northridge Lumber Camp.
Go straight to the lumber mill which is at the northeastern tip of the lumber camp.
Inside the lumber mill you should find a big crate named "Northridge Lumber Mill Crate". Click it and place the Termite Barrel on it. A barrel with green smoke should appear, click it and get the follow up.
Go
back to Chillwind Camp, turn in [55] A Plague
Upon Thee.
End of circuit Plaguelands #3
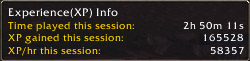
- Hearthstone to Ironforge. Resupply food/drink
(4 stacks). Sell and repair, visit the Auction House: this is your last
chance to buy your dungeon set 1 bracers, we are gonna need them now.
Go to
the throne room, get the quest get quest [60] An
Earnest Proposition from Deliana.
Also get [59] Kharan Mighthammer from
King Magni Bronzebeard while you are here.
Go to
Auberdine, fly to Everlook, Winterspring. (or ask a mage to teleport you to
Darnassus, then fly to auberdine --> everlook).
In
Everlook, turn in [58] Are We There, Yeti?
at Umi Rumplesnicker.
Turn
in [54] Felnok Steelspring, get the
follow up [54] Chillwind Horns.

- Ride straight north until you are in the area
east of Frostsaber Rock on the map. You will find Chillwind Ravagers
and Edler Shardtooths in this area. Kill every of them until you
have 8 Uncracked Chillwind Horns.
Once
you got 8 Uncracked Horns, go west, closer to Frostsaber Rock, you will find a
lot of tigers there. Kill them until you got 15
"Winterspring Blood Sample". This will take a while, but it's
normal, this is your new armor set quest (For Dungeon Set 2).
- When done, ride back to Everlook, turn in [54] Chillwind Horns, get the follow up [54] Return to Tinkee.
Hearthstone
to Ironforge, go to the throne room, turn in [60]
An Earnest Proposition at Deliana and get your Dungeon Set 1 bracers
updated! 3 Spectral stalkers (non elite) will spawn and attack Deliana,
help her to kill them.
Get the follow up [60] A Supernatural Device.
This is the next step for your armor quest, but we won't be doing it in this
guide, that's yet another thing for you to do at level 60!
- You should be approximately 2/3 done in your
level 59 by now.
It's
time for you to go to Blackrock Depths! Gather all the quests, follow this guide. Don't forget to
take your Altered Black Dragonflight Molt
with you, and also go turn in [54] Return to
Tinkee in the Burning Steppes at Flame Crest.
Doing
Blackrock Depths and all the quests should easily ding you 60, and some of
these quests are important for your level 60 life:
- [60] Attunement to the Core: which allows you to enter the
Molten Core (a high level 40-man raid instance) by a teleport window.
- [54] Marshall Windsor, which is actually the Onyxia Key
quest line.
However,
if after Blackrok Depths and all it's quest XP rewards you are still level 59,
here is one last bonus XP circuit (And remember, after patch 1.10 you will be
able to cash in quests for gold - means epic mount sooner ![]() ):
):
- Take two thorium
bars with you (buy them at the AH or something). Sell and repair,
resupply food/drink (4 stacks).
Go to
Gadgetzan, turn in [57] Mold Rhymes With...
get the follow up [57] Fire Plume Forged.
Ride
to Un'Goro Crater, right after entering it from the slope, go northwest to Fire
Plume Ridge, climb to the top of it. Go next to the lava pool and right click
your Skeleton Key Mold from your inventory.
- Get off the mountain by the west side, ride
northwest to the slope leading to Silithus (29,22). In Silithus,
ride west to Cenarion Hold (51,37).
Get [55] Securing the Supply Lines from Windcaller
Proudhorn. [55] Deadly Desert Venom,
from Beetix Fickelspragg on the 1st Floor of the Inn.
[58] The Twilight Mystery from
Geologist Larksbane
[60] Secret Communication from Bor
Wildmane
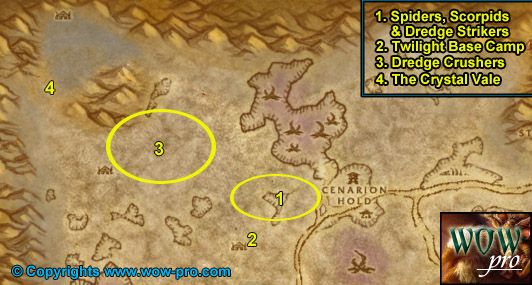
- Get out of Cenarion Hold by the west side,
keep going west a little bit, you'll quickly encounter Scorpids, Spiders
and Worms. Kill all of them on sight. Kill the Twilight mobs at the
Twillight Base Camp (41,42). There is a lot of scorpids, spiders
and worms in the area north of the twilight camp.
Keep
kiling around this camp until you complete [b][60]
Secret Communication[/b], [55] Deadly
Desert Venom and [55] Securing the
Supply lines.
It's
gonna take a while. But anyway this is good because you are working on our
cenarion faction (which is very good at level 60 for many reasons, check
Blizzard's homepage here for rewards etc.) and you get Glowing Scorpid Blood, which can be traded for
tickets at the Darkmoon Faire. (or sell for nice cash if you aren't
interested in the Darkmoon faire rewards).
While
killing Twilight mobs, you will sometimes find Twilight
Cultist Robe, Mantle and Cowl.
Keep
them, you will need them later on for level 60 faction quests with cenarion.
Things
to be careful with:
Don't
touch the greater wind stones or you'll get nuked by it. These stones are to be
used while wearing the full twilight cultist set and only when doing specific
quests. Don't bother with them for now.
Avoid Twilight Keeper Havunth, he hurts a lot and doesn't drop anything
particular.
The Scorpids you need to kill are the grey/green ones, named Stonelash
Scorpids, NOT the golden ones. Kill Twilight mobs until you finish [60] Secret Communication.
- You should finish the quest [55] Securing the Supply Line before the
others, go turn it in as soon as it's complete (along with the Secret
Communication Quest). Get the follow up [57]
Stepping Up Security, then go back to finish the other 2.
When
you are done with them, go northwest, kill every Dredge Crusher you see
on the way. Keep going northwest until you are in the northwestern most corner
of Silithus named "The Crystal Vale" (20,18). Look around for "Twilight
Tablet Fragments", they look like this:

As
soon as you have 8 tablets, go southeast
towards Cenarion Hold, kill every Dredge Crusher on the way so that you finish [57] Stepping Up Security.
- Go back to Cenarion Hold, turn in all the
quests, hearthstone to Ironforge, fly to Chillwind Camp, turn in [57] Fire Plume Forged, get the follow up
Araj's Scarab (that's for your
Scholomance key).
That should for sure make you ding level 60!
LEVEL 60 -- End
of chapter III!
-Jame